
old fashioned chocolatey fun
Normally, when one utters the dread phrase, "the in-laws are coming," the heart will race, the stomach will drop and panic will ensue. Not so much in my case - my in-laws are great. Sure, I have to do a little extra cleaning (and I'm the first to admit, that is most definitely not a bad thing...hehe...it's not like my house isn't crying out for it)....but overall they are great people. It's easy to see how hubs can be so awesome when you meet his family.
And I"m lucky - I've read the horror stories about in-laws from hell and I count my lucky stars every day....
SO this past weekend was my father-in-law's birthday. *We* were supposed to visit *them* but due to the NHL selling out to the US networks, it turned out that they would be in town for my father-in-law's birthday.
We ended up having a wonderful meal of grilled fillet mignon (provided by my in-laws and grilled to perfection by hubs) and caesar salad. It was only natural that cake would follow. My father-in-law is not one to be demanding or picky about food, and in fact I've seen him eat things I've made that I know he didn't really love (I love herbs and spices and I know it's not his thing). This is the first time he's ever requested anything, and all he wanted for his birthday was a chocolate cake.
Old fashioned cooking is not a strong point of mine. I've made more hockey puck baking (the closest I come to Canada's national sport) than I care to talk about so I was a little intimidated by the request for a good old fashioned chocolate cake. I have never actually purchased cake and pastry flour, nor do I even own a sifter.....so layer cake is scary. There's always that sinking feeling before you take the cake out of the pan.....will it even come out? If it does, will it be in one piece? Or crumbly little bits.
It's very scary.
So I turned to my old friend epicurious. During my search, I found a chocolate cake recipe that had no fewer than 900 reviews. I figured that even with my culinary irreverance, I would probably be safe with a recipe bolstered with that kind of street cred.
This has reaffirmed my love of epicurious. This double-layer chocolate cake is rich, dense, moist and awesome. I didn't make the recommended icing, as I thought ganache would be too much for a cake of this magnitude...I instead made a classic seven-minute frosting that proved to be a fluffy foil to the cake's richness. If you want chocolate layer cake, you should totally make this. It rocks.
Double Chocolate Layer Cake
For cake layers
3 ounces fine-quality semisweet chocolate (I used 76% Poulain)
1 1/2 cups hot brewed coffee
3 cups sugar
2 1/2 cups all-purpose flour
1 1/2 cups unsweetened cocoa powder (not Dutch process)
2 teaspoons baking soda
3/4 teaspoon baking powder
1 1/4 teaspoons salt
3 large eggs
3/4 cup vegetable oil
1 1/2 cups well-shaken buttermilk
3/4 teaspoon vanilla
Make cake layers:
1. Preheat oven to 300°F. and grease pans. Line bottoms with rounds of parchment paper.
2. Finely chop chocolate and in a bowl combine with hot coffee. Let mixture stand, stirring occasionally, until chocolate is melted and mixture is smooth.
3. Into a large bowl sift together sugar, flour, cocoa powder, baking soda, baking powder, and salt. (NOTE: I don't own a sifter. I didn't sift. So sue me.)
4. In another large bowl with an electric mixer beat eggs until thickened slightly and lemon colored (about 3 minutes with a standing mixer or 5 minutes with a hand-held mixer). Slowly add oil, buttermilk, vanilla, and melted chocolate mixture to eggs, beating until combined well. Add sugar mixture and beat on medium speed until just combined well. Divide batter between pans and bake in middle of oven until a tester inserted in center comes out clean, 1 hour to 1 hour and 10 minutes. (NOTE: I had 9" pans, and just held back a bit of the batter. I baked 50 minutes. Definitely check at 50 minutes because overcooked cake sucks.)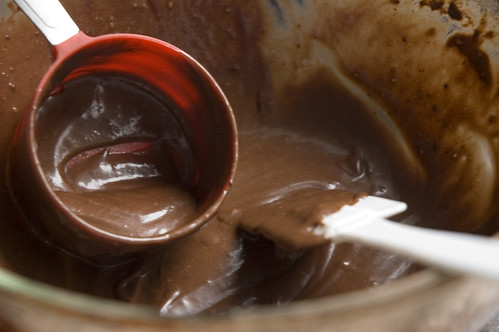
5. Cool layers completely in pans on racks. 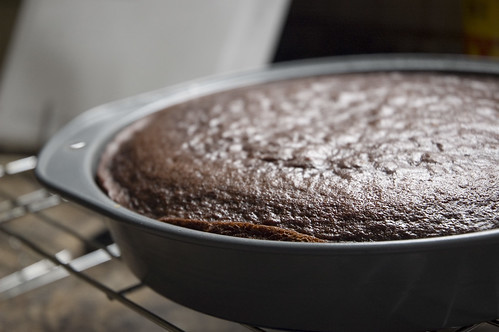
6. Run a thin knife around edges of pans and invert layers onto racks. Carefully remove parchment paper and cool layers completely. Cake layers may be made 1 day ahead and kept, wrapped well in plastic wrap, at room temperature.
Seven-Minute Frosting
NOTE: I made this recipe exactly and it was *barely* enough for a 9-inch layer cake. In the future, I would 1.5 times this recipe because 'boiled icing' is amazing and everyone loves it. I've seen a billion people pick off/scrap off buttercream, but NO ONE will scrap this stuff off. It is amazing.
1 cup plus 2 tablespoons sugar (I use half brown sugar to give a bit of a caramel flavour)
3 large egg whites
1/4 teaspoon cream of tartar
1/8 teaspoon salt
1 tablespoon pure vanilla extract
1. In large metal bowl, whisk together 1/3 cup water, sugar, egg whites, cream of tartar, and salt. 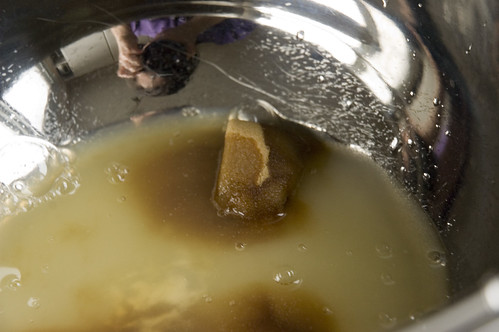
(and yes, that is me upside down)
2. Set bowl over pan of barely simmering water and mix with handheld electric mixer at low speed. Gradually increase speed to high, beating until mixture holds stiff peaks, about 5 minutes. 
(I hate icing and can eat this stuff by the spoonful - my mom made it for every birthday and I just love it. It's like crack).
3. Transfer bowl from pan to folded kitchen towel on counter and continue beating until mixture is cool and billowy, about 2 minutes more. Beat in vanilla. (Frosting can be made 4 hours ahead and chilled, covered.)
Makes about 1 quart.
To ice the cake.....
1. Take one cake layer and place it on your serving plate/platter/stand. To simplify life and make yourself look like a decorating super-star, take strips of wax paper and slip them under the cake (this way, after you've made a big old mess of icing, you just pull them out!).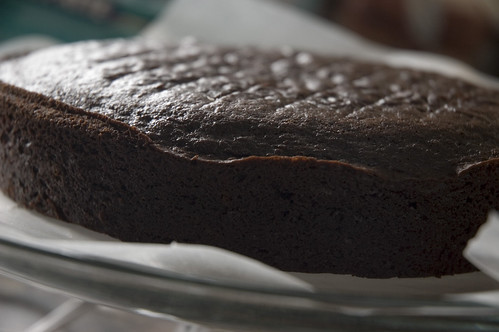
2. Spread about a cup (or so) of icing on top of this layer. Place the other cake layer on top (NOTE: I had the "flat" sides out because I wanted a flatter cake. Your life will be easier if you put the "flat" sides in toward the centre....the cake won't be as square, but it also won't be as fragile!).
3. With an off-set spatula, coat the cake with a very thin layer of icing (don't worry about the crumbs).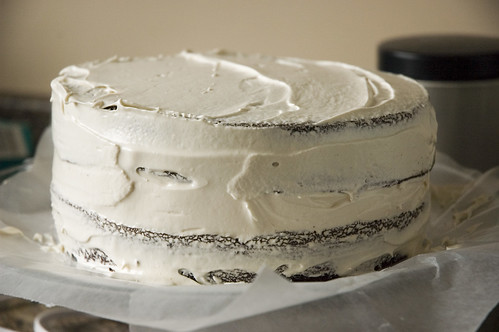
4. Use the rest of the icing to smooth over your crumb coat. I tried to make the icing on the sides smooth-ish, and the icing on the top with a bit of a swirl. Definitely check out these videos on epicurious for some pointers on having a nice-looking cake. 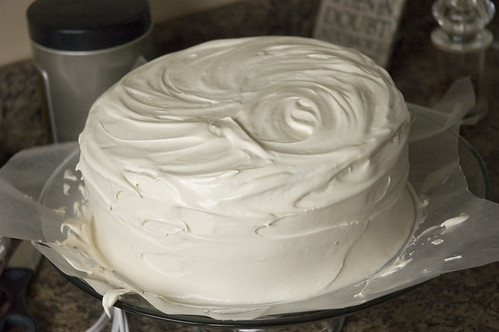
It would have been helpful to have a little more icing!!!!!
5. Decorate as you see fit. Hubs wanted me to try to write something on the cake, so I did.....I'll preface this by saying that I usually am more one who will 'artistically drizzle' rather than try to write....it never ends well. This is one of my better attempts, but still far from perfect....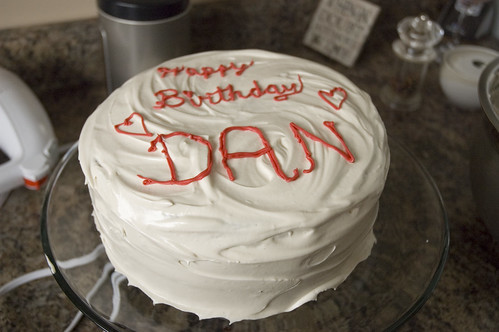
Thankfully, my father-in-law was forgiving of my poor penmanship, and the best accolade that I could have received was that a man (who shall remain ageless) had a nice hunk of chocolate cake for breakfast the next morning. High praise indeed. :)
Thanks for reading!


6 comments:
Okay my mouth is watering right now. My husband is the biggest chocoholic ever, and he is going to love this cake! Only thing is I know I will have to use the ganache too, or else he will complain...men!
Thanks,
Yum, yum, yum. I must try and find an excuse to make this cake sometime! I was just about to post a question about making the icing since I gave up my hand mixer when I got the Kitchen Aid, but I just remembered my immersion blender has a whisk attachment. Would that work okay???
YUM!!!
ohhhhh, that looks sinful.
A little tip, use a fine mesh sieve for sifting. I learned it from food tv.
christie - I think a whisk immersion blender would probably work....basically if it could whip cream, it will work for this. I don't think I could give up my hand mixer but I'm supremely jealous of your kitchen aid....
plantchick - thanks for the tip! It's pretty clear from my batter picture that the batter wasn't totally smooth, but it's a heavier, denser cake (moist, but not light a fluffy), so it didn't really detract. And as mentioned....I am SO lazy....
I was looking at some of your previous posts and wondered if you could make the chocohotpots ahead of time and then reheat them in either a microwave or toaster oven.
What do you think?
Post a Comment