Photobucket - Video and Image Hosting

Tuesday, November 03, 2009

fun event on thursday nov 5 for Ottawa foodies

Pin It Now!

Just a super quick post today (snuck in at lunchtime at work!).

I wanted to alert Ottawa foodies to an event that's coming up on Thursday evening called Sip, Swirl, Savour & Selebrate (sic). It is a cocktail-style wine tasting that will be featuring Ontario wineries and catered by executive chef Scott Lucas of TRIO. And there will be jazz. I've never been, and can't make it this year, but if anyone DOES go, lemme know how it is! Sounds like a fun night and a chance to try wineries you don't necessarily see at the LCBO - particularly from Prince Edward County and Niagara.

So here are the deets....
Thursday, November 5, 2009, 7 pm
TRIO Restaurant at Novotel Ottawa, 33 Nicholas Avenue
Advance tickets ONLY - $55, inc. GST (4 people for $200). Tickets can be purchased online at www.savvycompany.ca or by calling 613-728-8926.

Dinner last night was courtesy of Bombay Masala - enjoyed a delicious platter of appies, superlative garlic naan, chicken korma, beef curry and channa masala (soooooooooo good). Lil Z couldn't get enough (and, in fact, hollered her enthusiasm for ALL to hear at the restaurant...oops). Anyway, love this spot. Great northern indian cuisine, served with a warm smile and as much spice as you ask for.

Monday, November 02, 2009

if you can get past how gruesome this is, it's super delicious...

Pin It Now!

DSC_0861
My meat-eating status can best be described as fragile. Normally an avid omnivore, I occasionally find myself confronted, affronted and appalled by standard factory farming practices. One week, I will be chowing down on hotdogs like nobody's business...and then the next, I am disgusted by mechanical separation, coloured vats of pink paste and all that nice stuff.

I do generally try to purchase more ethically farmed meat; from local butchers, farmers or boutique grocery stores. I would be lying if I said that this were always a successful venture, but I do try to do my part.


One particular critter that hadn't really entered my radar was the cornish hen. Like oh-so-many people right now, I don't actually deal with a lot of meat that's still on the bone. I tend to find it more labourious, fatty and icky than its boneless, skinless counterpart, so I just don't tend to purchase a lot of bone-in cuts.


Given the small size of the cornish hen, it's pretty hard for it to enter into boneless territory. But after having tried it again, I have to say, it's worth the extra work and ickiness because it's just SO delicious. It's a bit more flavourful than chicken and it's sooooooo juicy and yummy.


I found this recipe in Clean Eating (Sept/Oct edition) and while it's healthy, it's one of the most delicious things I've ever eaten. If you're too skeeved to skin and flatten a cornish hen, you could do this with boneless, skinless chicken breast, but it wouldn't be neeeeearly as delicious. So I encourage you to stretch your horizons, gird your loins, and give this a try. Cuz it's so good.


Cornish Hens with Grape and Pistachio Couscous
(modified from the Sept/Oct edition of Clean Eating magazine)


3 cornish game hens (2.25-2.5 lbs each)
2 t fresh ground black pepper
2 t cinnamon
2 t coriander, ground
2 t ginger, ground
3/4 t sea salt
1/2 t nutmeg, ground
4.5 T olive oil
1 c low-sodium chicken broth
3/4 c whole wheat couscous
1 c seedless grapes, halved
3 T unsalted, roasted pistachios, shelled and chopped
4 green onions, thinly sliced


1. (This is the icky part). First, using sturdy kitchen scissors, cut the backbone out of the cornish hen. Flatten the hen (yes, you will hear bones break). Next, remove the skin (it's gross, but not that difficult). I didn't bother skinning the wings because I knew I wouldn't eat them and it was too much effort.


DSC_0867


2. In a small bowl, combine pepper, cinnamon, coriander, ginger, salt and nutmeg. Set aside 1 t spice mixture. Combine remaining spice mixture with the olive oil to make a paste. Rub the paste over the hens, dividing it evenly.


3. I bbq'd my hens. They were flattened on an oiled grill, and weighted down with a heavy cast-iron griddle. If you can't do this, you can bake them at 450F for about 30 minutes. Weighing the hen down is a really effective way to cook it - you could also use a cast iron skillet, or a cookie sheet weighed down with some bricks. It cooks fast and evenly this way. It's soooooooooo yummy.


DSC_0869


4. Meanwhile, in a medium saucepan over medium-high heat, bring broth and reserved 1 t spice mixture to a boil. Stir in the couscous, cover and turn off the heat. Set aside for 5 minutes (couscous is so fast and easy! love it!).


5. Stir grape, pistachios and green onions into couscous. Transfer couscous to a serving bowl or plates and serve alongside hens.


DSC_0874


A cooked hen:
DSC_0878


Technically, this will serve 6, but if you're big eaters, count on it serving 3 non-dieting types. It's yummy. The next time I went back to the grocery store after this, cornish hens were on sale, so I picked up a couple for my freezer. Yum!


DSC_0880


Day 2 down. 28 to go.


DSC_0881

Sunday, November 01, 2009

November is NaBloPoMo! how many days do you think I'll last???

Pin It Now!

DSC_3192
For years, I've been hearing about NaNoWriMo (National Novel Writing Month), where participants attempt to write a 50 000 word novel during the month of November. Given that I suck at fiction (and also at lying...as hubs will attest, I am the world's WORST liar), I've never even given participation a second thought. Any novel I would write would be awful. The very idea reminds of the times where I took writing classes in high school. I love writing, but I'm just not all that creative when it comes to plot and character and all the schtuff. I could do description like nobody's business, but just didn't have the creativity to come up with plotlines, etc., that would captivate.

However, the latest thing, if you will, is NaBloPoMo (National Blog Posting Month), which is much more up my alley. As the archives of this blog will attest, I am, at best, an infrequent poster. It isn't to say that I don't want to post, or that I don't have anything to say, but I just seem to have a hard time getting stuff from table to web site, if you catch my drift. So I'm going to give this a try. I certainly won't promise that you'll have photos and lovely descriptions every day, because I don't really cook THAT often. But I'll keep you abreast on what I'm eating, where it came from, and whether or not I liked it. Tonight, I made a pot roast for dinner. It sucked. I'm not posting it.

But my dinner earlier this week was FANTASTIC. Like, you know my aversion to leftovers?

I ate this for lunch THREE days in a row (I stole it from hubs!). It was that good. It's so hearty and delicious and wonderful and yummy that you will all be rushing out to make it. I stole the recipe from Cooking Light, but modified it to make it better. It's awesome. Z loved it, hubs loved it and everyone who saw the pic on facebook demanded the recipe. MMMMMMMMMMMMMMMMM...yummy. I doubled the recipe and baked in a 13x9

Roasted Butternut Squash and Bacon Pasta


Yield: 5 servings


Ingredients
3/4 teaspoon salt, divided
1/2 teaspoon dried rosemary
1/4 teaspoon freshly ground black pepper
3 cups (1-inch) cubed peeled butternut squash (for a doubled recipe, I used 2 small squash and it worked just about perfectly)
Cooking spray
6 sweet hickory-smoked bacon slices (raw)
1 cup thinly sliced shallots
8 ounces uncooked mini penne (tube-shaped pasta)
1/4 cup all-purpose flour
2 cups 2% reduced-fat milk
3/4 cup (3 ounces) shredded sharp provolone cheese (I used 5-year-aged cheddar)
1/3 cup (1 1/2 ounces) grated fresh Parmesan cheese
Preparation
Preheat oven to 425°.

1. Combine 1/4 teaspoon salt, rosemary, and pepper. Place squash on a foil-lined baking sheet coated with cooking spray; sprinkle with salt mixture. Bake at 425° for 45 minutes or until tender and lightly browned. Increase oven temperature to 450°. This will make your house smell AMAZING.

DSC_3170

2. Cook the bacon in a large nonstick skillet over medium heat until crisp. Remove bacon from pan, reserving 1 1/2 teaspoons drippings in pan; crumble bacon.

DSC_3180

Increase heat to medium-high. Add shallots to pan; sauté 8 minutes or until tender. Don't throw out your bacon fat yet!!!

DSC_3179

3. Cook pasta according to the package directions, omitting salt and fat. Drain well.

4. Add another 2 T of bacon fat to your shallots (yum!). Combine flour and 1/2 teaspoon salt and add to the shallots over medium-high heat. Let it cook for a couple of minutes. Gradually add milk, stirring constantly with a whisk; bring to a boil. Cook 1 minute or until slightly thick, stirring constantly. Remove from heat. Add provolone (cheddar is better!!!), stirring until cheese melts. Add pasta to cheese mixture, tossing well to combine. Add bacon and squash and stir gently (or you will mash the squash) Spoon pasta mixture into an 11 x 7-inch baking dish lightly coated with cooking spray. Sprinkle evenly with Parmesan cheese. Bake at 450° for 10 minutes or until cheese melts and begins to brown.

DSC_3184

It's so good. YUM. The squash is so rich and with the savoury addition of the rosemary and the smokey bacony goodness...this is the PERFECT fall comfort food. You definitely want to make this ASAFP.

So, here's to day one of NaBloPoMo. Hope we have another fruitful 29 days.

DSC_3195

Thursday, October 01, 2009

just cuz it's quick doesn't mean it can't be awesome

Pin It Now!

DSC_2305

So....I was watching Chopped tonight. On the one hand, I love this show. It's quick, you're watching pro chefs sweat it out under crazy conditions and expectations, you have the fabulously bitchy Alex Guarnaschelli expressing profound displeasure with pretty much every dish. On the other hand, a lot of the food doesn't really look that great. I hate watching people labour under unreasonable time constraints and ending up not finishing something by a matter of mere seconds. It's sad. And totally ridiculous.

BUT, the reality is that most of us have a lot of constraints when it comes to our cooking. We have budget constraints (what? you mean I can't have tenderloin every night? dammit.), availability constraints (avocados in Ottawa are almost invariably rock hard), but most importantly, most of us have TIME constraints. I can't even COUNT the number of times I've had the greatest intentions of making a fabulous meal, only to end up fixing a cold plate, ordering in, or just noshing on whatever I can scrounge up. When you're working, commuting, and basically just trying to live (whether you have kids, a partner, pets, activities), sometimes it's just freaking hard to cook.

So this is something that you can make REALLY quick. Perfect for a night when you want a little bit of fabulous, but are short on time. The ingredients are simple, prep is dead easy, and it's pretty hard to screw up.

Sesame-Crusted Tuna with Coconut Rice and Garlic Greens
4 tuna steaks (very good quality --> I bought mine frozen to balance freshness/cost)
2 T each white and black sesame seeds (you could do it with just one type of seeds; my choice is purely cosmetic)
salt, pepper, sesame oil

rice
1/2 t coconut extract

2 T sesame oil
6 cloves garlic
2 T ginger
1/2 t hot pepper flakes
1 lb greens (spinach, kale, chard, whateva)
2 T soy sauce

1. When you get home, start the rice with the coconut extract. Yes, you could use coconut milk to cook the rice, but I personally find it makes for a very heavy dish. Plus, I have a dress that doesn't zip that I NEED to wear in 10 days. No coconut milk here. I use a rice cooker for my rice. You should too.

2. While the rice is cooking, heat two large pans on the stove (both medium-high heat).

3. Mix your sesame seeds on a plate. Season the tuna with salt and pepper. Press the tuna (both sides) into the sesame seeds. It should look pretty cool.

DSC_2300

4. Add the tuna to one of your pans (along with sesame oil). It should cook about 4-5 minutes on each side. At the end, it will be rarish. This is okay (as long as your tuna is fresh). Don't overcook it or it will become like canned tuna (i.e., way too dry to actually be enjoyable like this). Rare tuna is a very very distant relative of its canned and processed brethren. Don't kill it.

5. While tuna is cooking, prep the garlic, ginger and greens. Add the sesame oil to the pan, then add the garlic and ginger and stir-fry briefly. Add your chopped greens and stir-fry until wilted. Then add the soy sauce.

DSC_2303

If you're pretty efficient, you WILL be able to get this on the table in less than half an hour. That's not bad for a meal that tastes great, is relatively balanced and looks so cute. :)


Thursday, September 17, 2009

cool event for Ottawa beer lovers

Pin It Now!

Just got a heads-up about a pretty neat sounding event happening in Vankleek Hill.

On October 3rd, Beau's All Natural Brewing Company is having their 1st Annual Oktoberfest Celebration.

They've partnered with some pretty stellar restaurants (Allium, Domus, Murray Street Kitchen Wine & Charcuterie, Pascale's All Natural Ice Cream, The Piggy Market, Urban Pear and Whalesbone; and a few hidden gems from further out: Ballygiblins (Carleton Place), The Branch Organic Restaurant (Kemptville), Knox Fine Dining (Moose Creek) and Mary's Country Kitchen (Vankleek Hill)) so it sounds like it would be a good time

You can get more information here: http://www.beaus.ca/oktoberfest/ . But the gist is that there is food and beer and admission is $12 in advance, $15 at the door. You can get tickets at Bridgehead or at the Piggy Market.

Oh yeah, and Vankleek Hill is here, about an hour east of Ottawa. They've got a shuttle service from Saint Laurent if it's too far for you - $25, including your admission. Not a bad deal for a cheap ride home.

Will see if I can interest hubs and Lil Z. :) Thanks for reading!

Tuesday, September 15, 2009

going all martha on you

Pin It Now!

DSC_2293

There are a number of things that I have always found super duper intimidating. They are things that other people do....not things that I could ever (generally) contemplate doing. Things like pickling, preserving, growing and such. And scariest in this list of things that other people do is pasta making.

Why would anyone endeavour to make their own pasta? It brings together all sorts of things that cause me no end of trouble...WHY in the world would I want to roll my own dough. And really, why would I want to expose myself to more dough frustrations than are strictly necessary?

But there were a few pasta making incursions into the edge of my consciousness, leading me to believe that maaaaaybe, just maaaaybe, pasta wasn't going to be this impossible thing I would never be able to achieve. Most specifically, I'm utterly addicted to Iron Chef America. I love this show for so many reasons (not so much the battle: offal that I'm watching right now...yuck!!! YUCK YUCK YUCK. What I love about this show is not just the crazy intense pace, but the fact that you see real chefs at work in the kitchen with real food. There's no magic going on - lots of knives, boards, bowls and grills. They use the same ingredients, and even the same equipment I do. I was entranced when I saw someone (sorry, can't remember who!) just piling flour on the counter and deftly nestling eggs right in the middle to create a perfect pasta. And of course, I saw them using the same mixer I have (actually, mine's nicer than theirs...) to make pasta. And they're doing this AND four other dishes in an hour. It almost seems like I'd imagined that real chefs had some sort of alchemy they were working in the kitchen; like it wouldn't ever be possible for me to cook the same types of things they were cooking. Besides, I adore eating out, so why would I want to imitate the snazzy eats I so enjoy.

Of course, then I started paying for day care. And paying for bus passes again. And all of those myriad expenses that go with returning to work. Net result is a temporary moratorium on meals out. And lots and lots of home cooking.

So....about making pasta.

Normally, I wouldn't. Make pasta, that is. And for this reason, I'd resisted picking up the pasta maker attachment for my beloved kitchenaid. I wasn't sure I would ever use it, and given my dough phobia, I thought it perhaps not the wisest investment for me (I've got the meat grinder already and it's FABULOUS and I've been eyeing the ice cream maker, but until I have more than two pairs of pants that zip...that's also on hold).

Buuuut....the nice people at kitchenaid were kind enough to send a pasta maker attachment to me (full disclosure here, peeps!), so I'll let you know what I thought. Though I can't say that I'll be making pasta all the time now, my pasta actually turned out much better than I thought and I will, in fact, be using it again. Many times. :) Hopefully for a looooong time to come.

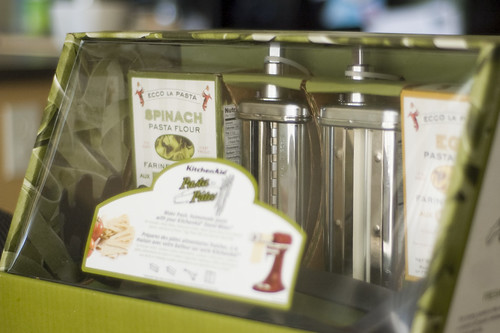
I was actually sent not just the pasta maker, but a complete kit (view below):
DSC_2268

It includes a roller and a cutter (for fettucine), a couple of utensils, two pasta mixes and an instruction manual/recipe book. It's an attractive package, though a bit of a beeeotch to get out of the packaging. The very first time I used it, I do confess to making one of the mixes. It turned out perfectly. But really, if you're going to go to the trouble of making your own pasta, why the heck would you make it from a just-add-water mix? Pasta is NOT that complicated - flour, eggs, salt, water. So don't use a mix. It's like making a perfect, beautifully decorated wedding cake and then the cake underneath is from cake mix. Why labour for hours and give Duncan Hines (or someone else) all the credit????? Weakness.
Anyway, yeah, the mix turned out perfect and was easy to make and tasted great. Not knocking the mix at all. Just the idea of the mix, hehe.

So I've got pictures of my second go at making my own pasta. Step by step. Witness my transition from dough phobic to mistress (dominatrix?) of all things starchy.

I'm going to talk you through the process of actually making the pasta, and I"ll include the recipe at the end. Because I wanted to be as authentic as possible (come on, I was making my OWN PASTA!), I decided to use semolina flour, rather than all-purpose. Semolina is a high protein flour made from durum wheat. Apparently, it's better than regular flour for pasta because it creates a stronger gluten structure. Since I haven't actually made all-purpose flour pasta, I couldn't really tell you the difference.

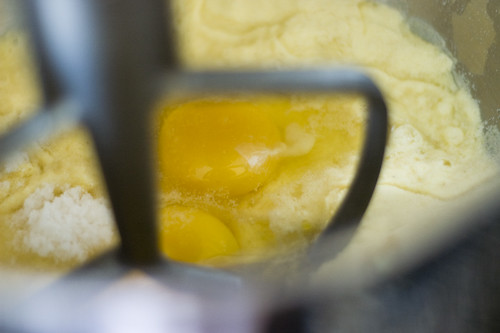
Anyway....you start by mixing the eggs, water, oil, semolina flour and salt (speed 2 with regular beater).

DSC_2276

Then you use the dough hook for a couple of minutes. Then you need it by hand a couple of times too. Then you divide it into eight (aw crap, I read the wheat directions, which have you dividing it in four...that explains why my pasta sheets were like four feet long, lol).

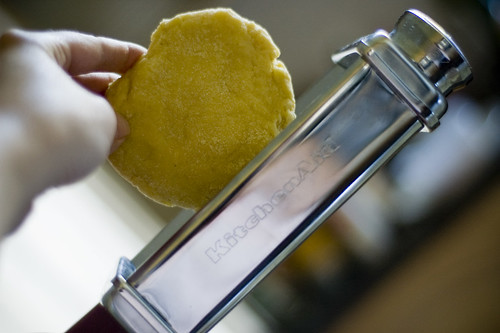
Then the fun begins. With each small piece of dough, roll it out a bit. The instructions said to flatten slightly, but I didn't have a lot of luck with that. I rolled it out to about 1/2" thick. You have to set the roller at the widest setting (number one) and then stick your dough there, turn the speed to 2 and hope something works.

DSC_2277

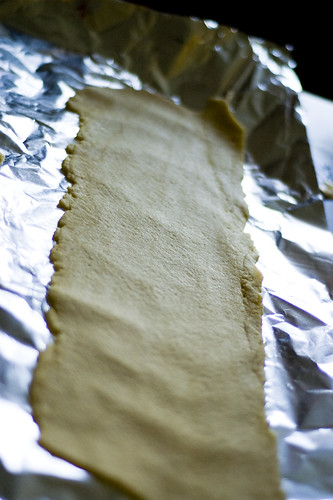
Mine worked not bad (witness, below):
DSC_2278

For this first pass through, obviously the dough looks like poop. Ragged, uneven, etc. So you fold it in half and put it through again. You do this a few times until it looks somewhat squarish.

Mine's still a little uneven, but I was impatient, hehe.
DSC_2279

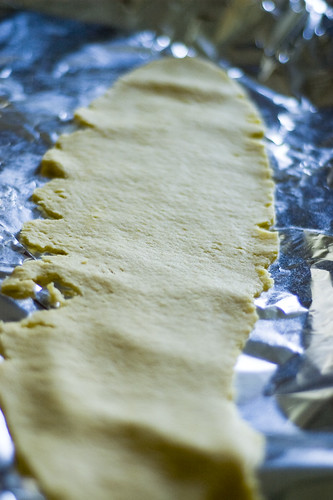
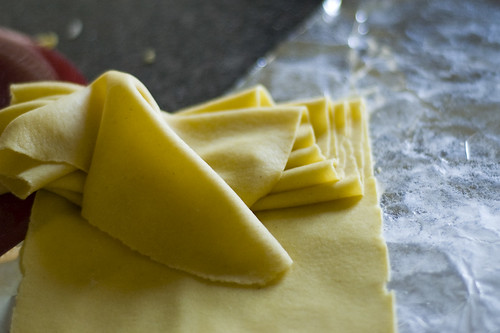
After this, you change the roller setting (one at a time) and keep rolling your pasta until it hits the desired thickness. For fettucine, I like thickness four - something substantial. Plus, it's easier to work with.
DSC_2281

I confess to being transfixed at the watching the sheets stretch and pass through the roller. It was cool.

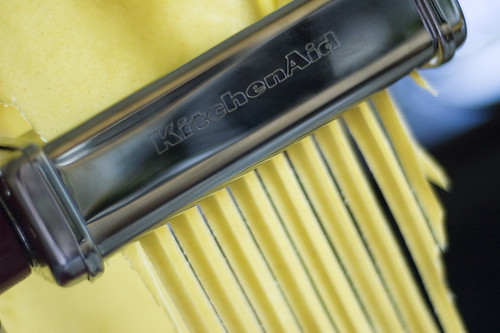
After that, I switched attachments and put the cutter on. Because I was a tool and only divided my dough into 4, my sheets were crazy long. Like longer than Lil Z. I cut them in half before putting them through the cutter. I used speed 2 again. I also had a lot of fun getting this pic (holding pasta in one hand, camera in the other, and just crossing my fingers that my freakishly long arms were long enough for my lens to focus):
DSC_2285

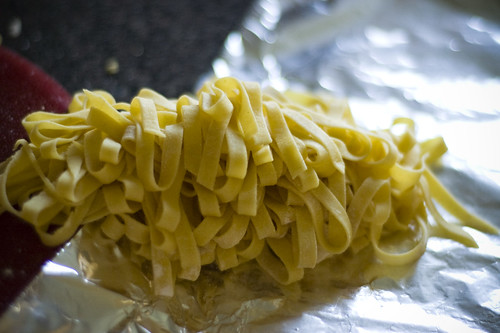
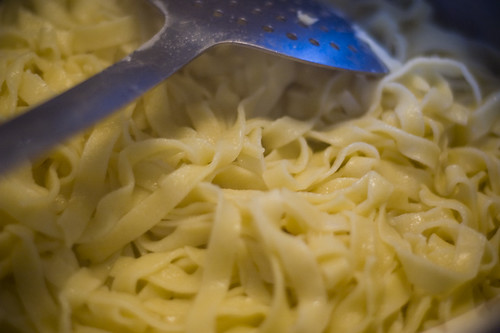
Looks like this coming out:
DSC_2286

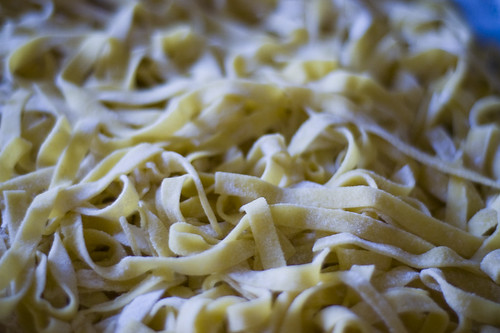
I toss in LOTS and LOTS of flour. I couldn't quite figure out how to get my pasta stretched back out, so the flour kept it from becoming a gooey gluey mess before I had a chance to cook it.

Miles and miles of pasta....
DSC_2289

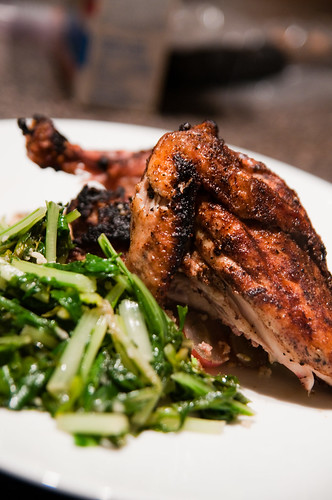
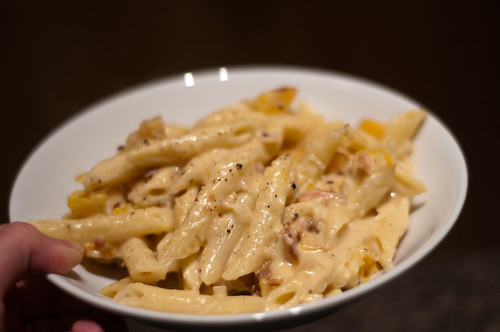
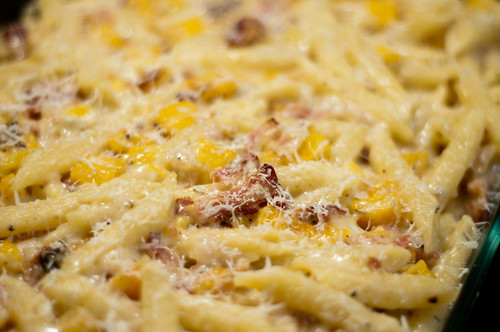
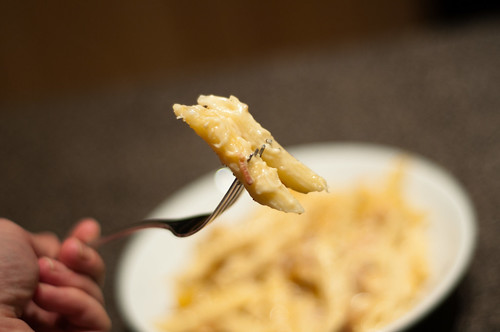
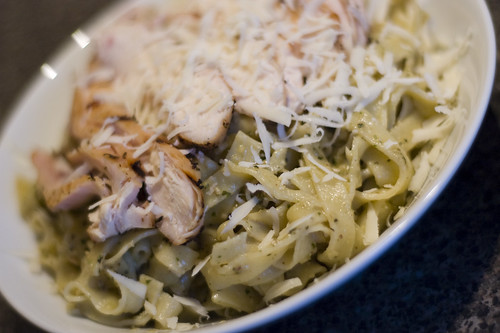
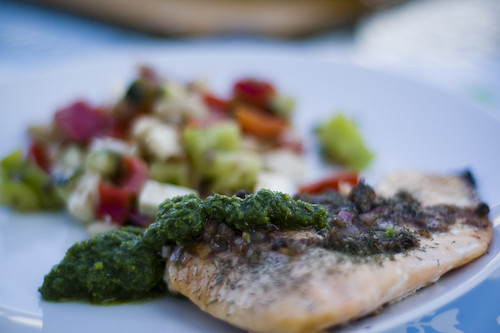
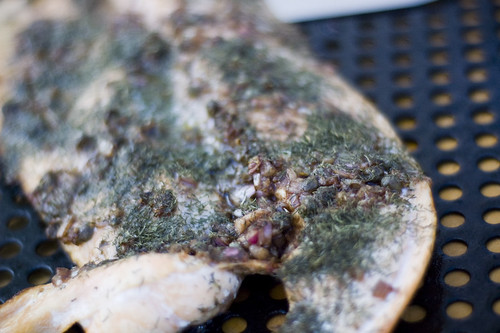
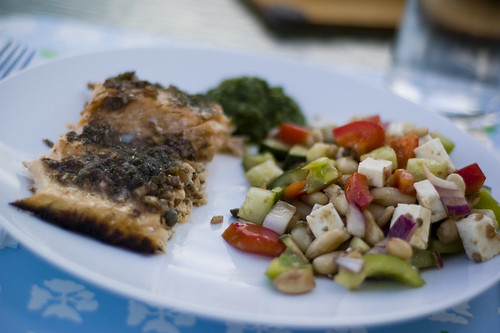
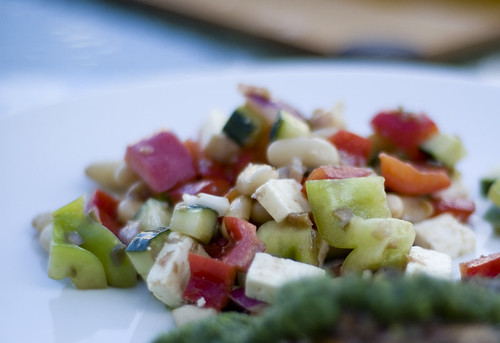
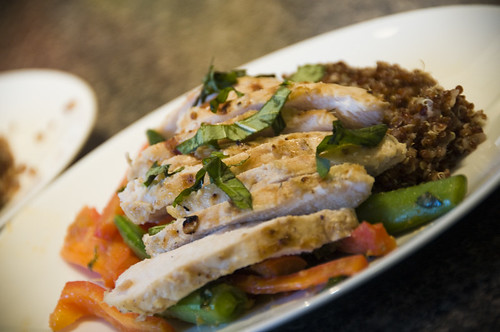
The pasta itself cooks in a snap (about 3 mins - start checking at 2 mins and drain when it hits your desired firmness. After all the work of making my own pasta, I didn't want to drown it in a heavy tomato sauce, so I decided to have a simple pesto cream sauce with grilled chicken. Recipe below.

Pesto Cream Fettucine with Chicken
1 recipe semolina egg pasta, cut into fettucine (below)
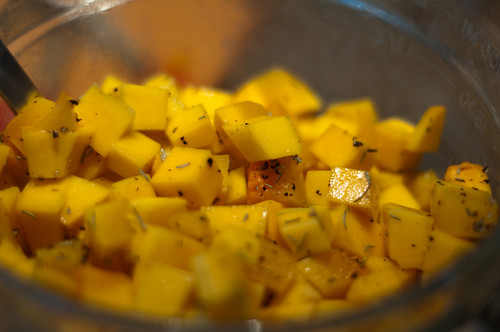
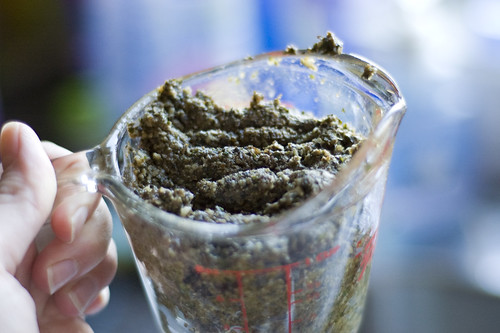
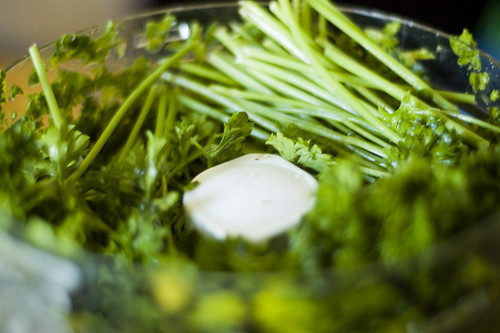
1 cup pesto (my recipe: bunch of basil, 1/3 c pine nuts [i had pecans], 4 cloves garlic, 1 cup parmesan, 1/3 c olive oil, process in food processor. season to taste)

DSC_2290

1 cup creamy stuff (I used evaporated skim milk..no, it's not as good as heavy cream, but it's not bad and high in calcium...light sour cream might work
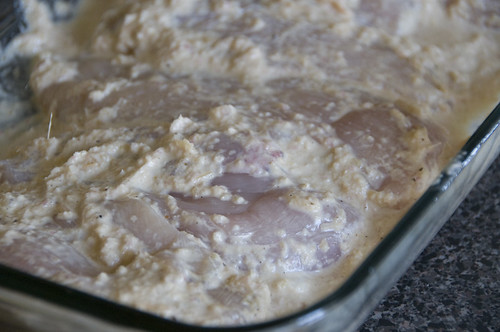
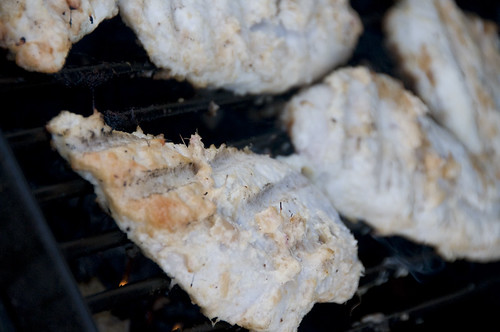
4 chicken breasts (I brine mine in a mixture of salt, steak spice and sugar for about an hour, then grill)

1. Cook pasta 2-5 minutes.
2. While pasta is cooking, heat pesto and creamy stuff together.
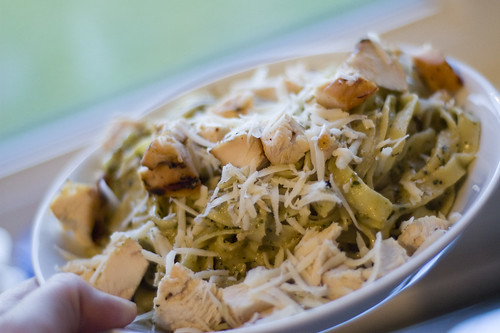
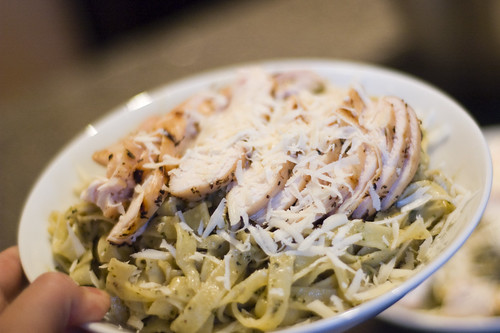
3. Grill chicken, let rest 10 minutes, then slice. Hubs and I are divided on slicing style.
His:
DSC_2297

Hers:
DSC_2299

4. Mix sauce with pasta, serve and top with chicken.

Semolina Egg Pasta
4 eggs (7/8 cup)
2 T water
1 T oil
3 1/3 c. semolina flour
1/2 t salt

1. Place eggs, water, oil, flour and salt in mixer bowl. Attach bowl and flat beater. Mix 30 seconds on speed 2.

2. Change to dough hook. Knead 2 mins on speed 2. Remove from bowl and hand knead for 1-2 mins. Divide into 8 pieces and roll as I explained above.

3. Cook 2-5 minutes in boiling salted water.

DSC_2292

(PS - If you have no machine, you could still make your own pasta. It can definitely be mixed by hand. Check out this link for more instructions: http://recipes.variousstuff.net/technique/Pasta%20by%20Making%20Pasta%20by%20Hand.html ) It certainly wouldn't be my cup of tea, but it is possible. You could also mix by hand and then get a hand-powered pasta roller to roll out your pasta. Labourious, but substantially cheaper than investing in a mixer and pasta roller attachment (they ain't cheap!).

Overall, I would totally recommend this to someone who is looking to add a little more cachet to their cooking arsenal. It was surprisingly easy to use, much less disastrous than I anticipated it would be and the pasta was really good! You do have to be careful not to overcook it as it gets a little too glutinous and soft rather quickly (my first batch was perfect, but I actually overcooked this by a bit). You can find the pasta kit for sale in a few spots, should you be interested (nope, I don't get kickbacks...I already got my kickback, hehe) -
Americans - kit is $149.99 here. Canadians - you can find it here for $199.99.

And as I said, I did receive it as a gift, but hopefully you guys have been reading long enough that you know I'd only give you an honest account of this...bs and pr ramble free. :)

Thanks for reading! My next little project is to use the sheets to make a lasagna and to find rennet tablets somewhere so I can make my own homemade mozzarella....any ideas Ottawa peeps?


Sunday, August 30, 2009

tasty fare for the waning days of summer

Pin It Now!

DSC_2175

As promised, this is the most amazing freaking salmon you will ever eat. I was so incredibly impressed with this - it's pretty much better than any salmon I've ever eaten in a snazzy restaurant, and it's such a healthy indulgence too. You can't go wrong with this. Assuming you actually eat salmon.

Grilled Salmon with Tuscan Beans and Heirloom Tomatoes
caveat: I did not, in fact, have heirloom tomatoes...sorry. Actually, I didn't have any tomatoes. My tomatoes, which I had been saving all week for this recipe, were rotten. I used green pepper and feta instead. Probably...okay, NOT AT ALL the same, but whatever. It was good.

from Clean Eating magazine, with lots of mods from DNM

1 can white kidney beans, drained and rinsed
1/2 onion, thinly sliced
1 large red pepper, chopped
side of salmon
1/4 c dried dill (seems excessive but was yummy)
cooking spray
2 large heirloom tomatoes, diced
[1 green pepper, chopped]
[100 g feta, cubed]

Marinade:
1/4 c extra virgin olive oil
1/4 c balsamic vinegar
2 shallots, minced
4 cloves garlic, minced
2 oz capers, drained, rinsed well and chopped

1. Prepare marinade: in a measuring cup, whisk together oil, vinegar, shallots, garlic and capers. Set aside.

DSC_2168

2. In a bowl, toss beans, onion and pepper[s and feta] with half the marinade. Set aside. Pour remaining marinade over salmon and sprinkle with dill. Let marinate at least 30 minutes, or up to a day (refrigerate if longer than 30 mins).

DSC_2169

salad:
DSC_2171

3. Cook salmon. I cooked mine on the barbecue, on an oiled veggie tray (best of both worlds - you get the pure utter deliciousness of grilled salmon, without the pain in the ass of flipping it, or having it stick). I cooked it until it was done (about 10 mins? maybe?) but didn't flip it. This kept all the super fabulous marinade and dill where it belonged....on my salmon....rather than in a burnt offering stuck to my grill). Transfer salmon to a platter and serve with chimichurri sauce (recipe below).

DSC_2173

4. Toss tomatoes with bean salad and serve with salmon. I didn't have tomatoes. So I had a bean/feta/onion salad. It was awesome.

DSC_2179

salad close-up:
DSC_2176

Chimichurri sauce (makes waaaaaaaaaaaaaaaaaaaaaaaaaaaaaaay too much for one meal unless you plan to eat it as soup. I froze the rest, but consider halving the recipe)
4-6 cloves garlic, peeled and chopped
2 bunches parsley, including stems, washed
2 T dried oregano
6-7 fresh basil leaves
1 small jalapeno pepper, chopped
6 T olive oil
6 T apple cider vinegar
juice of one lime
sea salt
pepper
[I added a good healthy shake of cumin and some smoked paprika to get a heartier, richer flavour]

1. Puree the whole mess in a food processor or blender. VOila. That's all there is to it.

DSC_2172

This is a very intense, flavourful sauce. It was superlative with the salmon. in fact, probably the best combination of salmon-friendly flavours that I"ve ever eaten. The whole time we were eating this, I was actually moaning and groaning with pleasure. Hubs would have normally humoured me, except we were outside and have no fence....hehe. Apparently, I can be embarrassing in my culinary enthusiasm at times??? who knew...

Anyway, this salmon recipe was amazing. The very edges of my side of (skinless) salmon were just a bit crisp, but the whole of it was moist and juicy and decadent and flavourful. Considering this came from a healthy eating magazine....colour me impressed. DELICIOUS. Make it.

Thanks for reading. ;) And if the blog is too infrequently updated for your taste, follow me on twitter! I tweet all the time and it may satisfy your cravings for indulgent food-related snark.

when precooked frozen lobster is $3, buy some...

Pin It Now!

...and ask questions later...


DSC_0391

And this is what I did. I saw the lobster, I grabbed it....and then I got home, and didn't really know what to do with it. They were kinda weeny (obvy, at $3, they would be)...and frankly, the bag smelled a weeeeeeeeeee bit fishy. I tossed them in the freezer and decided to, in the manner of dear Scarlett, think about it another day.

A month passed, and the lobsters still weighed on my mind, having been joined by a rather large package of jumbo scallops.

And then my dad was coming to visit. Now, my dad lives in Thailand half the year, and is married to a lovely woman from Thailand...so whenever he comes to visit, I try to make something that is really NOT thai (because a) I have an inferiority complex and can't compete with his wife's spicy creations and b) I figure I will feed him something a little different from what he normally eats). Plus, my dad is generally a willing subject for culinary experimentation.

So I decided that I would turn these sub-par lobsters and giant scallops into risotto.

And that I would make lobster stock.

On a weeknight.

Right after returning to work after my year of mat leave.

Ill conceived? Perhaps. But it worked out just fine. That said, I think as far as risotto goes, I do prefer a good old mushroom risotto with rosemary. It's cheaper, fast, less of a paaaaaaaain in the ass with the whole making-your-own-stock idea, and I think I like it better. But the seafood risotto is good. And if you find yourself struggling with a destination for your frozen-pre-cooked only-vaguely-sketchy lobster...go for it. This recipe works.

Lobster Broth
2 lobsters
1 onion, couple of carrots, celery
bay leaf
parsley
salt, pepper

1. Crack and dismantle the unfortunate arthropods. I can't do this. I make hubs do it. The second my food stares at me, I become an avowed vegetarian for the next 15 minutes.

2. Put the shells in a pot, cover with water, add a quartered onion, couple of carrots, some celery, maybe some garlic, a bayleaf or two and some fresh parsley. There's no real science or recipe to it. If you have time to burn, consider roasting the shells in the oven for more flavour. (As above, it was a weeknight...therefore, quicker = better). Let it all bubble away for an hour or so. Add some salt and pepper. I found the broth a little week, so I also added a rounded spoonful of chicken bouillon (yes yes...sacrilege....deal with it).

DSC_0364

3. Strain the chunky bits out and keep the broth at a simmer (risotto works best with simmering stock).

Risotto:


5-6 tablespoons butter
1 small onion, finely chopped
2-3 cups chopped veggies (I used summer squash and zucchini because I had a surfeit of both)
DSC_0370
2 cups rice
1/2 cup white wine
6ish cups stock
1 teaspoon salt
Grated Parmesan cheese

1. Melt 3 tablespoons butter in a heavy pan. When it is bubbling, add the onion. Cook for 2-3 minutes; do not allow the onion to brown.

2. Add the rice and the veggies and stir it well with a spatula; do not allow it to color. Be certain that the onion and rice are well coated with the butter.

DSC_0376

3. Add the wine and let it almost cook away.

4. Start to add stock, a half cup at a time. Let each half cup of stock cook away before adding more. As the rice becomes tender, stir it keep it from sticking to the pan. You're going to be stirring for a solid half hour. I'm just warning you. It takes foooooorever.

DSC_0382

5. Add salt. When the rice is done, stir in the remaining 2-3 tablespoons of butter and a little grated Parmesan cheese. Serve at once. Top with lobster and scallops

Definitely not the most photogenic dish I've ever made....
DSC_0401

Seared Scallops
1 pound sea scallops
salt
pepper
2 T each, olive oil and butter

1. Pat the scallops dry (the wetter they are, the less they will sear. Of course, if you have my $#&*#@@# stove, they won't really sear at all).
DSC_0375

2. Heat the olive oil and butter over high heat. Season both sides of the scallops with sea salt and pepper.

3. Sear the scallops on both sides until they are nice and brown. Contrary to popular belief, it isn't necessary to completely utterly cook them into oblivion. A little translucency in the middle just makes them taste better. As with any food though, there is a certain level of risk with them being underdone. Doesn't stop me from eating sushi, or eating medium-rare meat....but it's important to assess your comfort level (Z certainly didn't have any of this dish!).

DSC_0380

4. Remove the scallops from the pan. Add some white wine and scrape up the brown bits. Add a bit more butter. Turn off the heat. Return the scallops to the pan and add the lobster, heating through. Serve over the risotto.

This definitely garnered rave reviews from all involved. I liked it....but like I said, I like my mushroom risotto better. Hubs opinion? Good.

quinoa chicken and veggies...oh my!

Pin It Now!

DSC_0311

I'm not sure where you all live, but from my Ottawa-based perspective, summer has been a total write-off. Rain, rain and more rain. Cool weather (downright chilly yesterday, quite frankly). Miserable forecast, after miserable forecast. It has royally sucked. Blah.

BUT, that hasn't stopped hubs and I from enjoying yummy food from the grill (or food that tastes like it could maybe be from the grill). Though we've only had one alfresco meal this summer (a rotten record, I concur), we haven't starved yet.

I've got three yummy things for you today - a tasty grilled lemongrass chicken with quinoa (courtesy of epicurious), a DNM original seafood risotto, the best grilled side of salmon you'll ever eat in your life (courtesy of Clean Eating magazine).

We've been having a lot of fun introducing Z to all sorts of new foods. Thus far, the kid seems to have an undiscrimating palate. I could fool myself into thinking that she's a bit of a pint-sized gourmande, but I think she just eats everything, and asks questions later. She quite liked this lemongrass chicken recipe. I thought the chicken part of the recipe was five-star. It was juicy, flavourful and delicious. I loved the smokiness from the barbecue and the zip from the marinade and it was awesome afterward in wraps, salads, etc. The quinoa was a bit meh. I was initially excited by the idea of red quinoa, but this recipe just doesn't do it for me. I've discovered that quinoa is a real black hole for flavours....no matter how much you add to it, it just soaks it up...so while one might think that cooking in broth would result in a lot of flavour....it really doesn't. I think you're better off tossing the quinoa with a little oil (to seal it off) and then a little something with acid and bit (like lime juice and chopped onion....or something like that).

Red Quinoa vs. regular quinoa:
DSC_0290

The chicken is totally worth it. Also, it seemed a bit of a shame for me to throw out all that flavourful chicken marinade, so I used it to cook my veggies. DOn't worry though, I browned/cooked it THOROUGHLY before the veggies touched the pan. :)

Grilled Lemongrass Chicken with Red Quinoa and VegetablesSELF | July 2009


Yield: Serves 4
ingredients
3 medium shallots, roughly chopped
2 stalks fresh lemongrass (tough outer leaves removed) (I could only get jarred lemongrass....it was fine)
1 piece ginger (about 1 1/2 inches), peeled
1/4 cup plus 5 teaspoons canola oil, divided
1/4 cup fresh lime juice
1 tablespoon tamari (or soy sauce)
2 tablespoons light brown sugar
1 1/2 teaspoons sea salt, plus more to taste
1 teaspoon freshly ground black pepper
1 teaspoon ground coriander

4 boneless, skinless organic chicken breasts (about 5 ounces each)
3/4 cup red quinoa

1 1/2 cups chicken broth (or stock)

Vegetable oil cooking spray

1 pound fresh sugar snap peas, strings removed
1 red bell pepper, cored, seeded, and thinly sliced
2 tablespoons chopped fresh mint

1. Marinade: Puree shallots, lemongrass, ginger, 1/4 cup oil, lime juice, tamari, sugar, sea salt, pepper, and coriander in a blender until smooth.

2. Place chicken in a baking dish and spoon on marinade, rubbing it on all sides. Cover; chill 1/2 to 2 hours.

DSC_0288

3. Heat 2 teaspoons oil in a medium saucepan over medium-high heat. Cook quinoa until toasted, 3 to 4 minutes. Add broth; bring to a boil. Cover, reduce heat to medium-low and simmer until quinoa absorbs liquid, about 20 minutes. Turn off heat; let sit, covered, until ready to serve.

4. Heat a grill pan or skillet over high heat; coat with cooking spray. Cook chicken, turning once, for 4 minutes. Reduce heat to medium. Cook, turning once, until a meat thermometer reads 165 degrees, 10 to 12 minutes. Remove chicken; let rest two minutes. (I cooked mine on the barbecue - highly recommended if you have one!!!!)

DSC_0303

5. Slice each breast on the diagonal into 1/2-inch pieces.

6. Heat remaining 1 tablespoon oil in a large skillet over medium-high heat (I added the leftover marinade). Cook sugar peas and peppers until crisp-tender, about 3 minutes. Season with salt and pepper. Turn off heat. Add mint and toss. Divide quinoa among 4 plates. Top each with 1 sliced chicken breast and 1/4 of the vegetables.

DSC_0304

Our plates looked liked this:

DSC_0310

Z's was a little different....she did like it though! Gobbled up the chicken like there was no tomorrow.

DSC_0334


I'm putting the other two recipes in their own posts! Thanks for reading and enjoy the tasty eats........mmmmmmmm...........grilled chicken.....

Related Posts with Thumbnails