Photobucket - Video and Image Hosting

Wednesday, November 26, 2008

one thing that annoys me...

Pin It Now!

...is a website that pretends that I write for them.

Check this out:
http://www.emaxhealth.com/1/15/26837/pumpkin-swirl-cheesecake-recipe.html


I don't write for them. I've never written for them. I will never write for them. They certainly never contacted me to have permission to post my work, and in fact, even if they had I would have said no.

This is a spammy/full-of-ads website.

And I don't do ads here on my blog (okay, except maybe the one for my own business below, lol). I don't make one teeny little cent off my blog and that's a deliberate decision. The things I want you to buy (like fresh meats, produce, etc.), generally don't have ads and I'm not really interested in promoting whatever brilliance google ads would come up with.

So there's my rant. I tried submitting a comment indicating my objection, but of course it's not been posted. What a bunch of larcenic poops.

Just so there's a culinary tone to the post...thought I would share my list of supposedly gourmet things that I can't STAND:
1) dates. they look like cockroaches and I just can't get past that.
2) blue cheese. the taste is simply foul.
3) goat cheese. it grosses me out. I keep re-trying it and it just doesn't get any better.
4) food that still has a face. I'm not a vegetarian, but I draw the line at food with eyes still attached (full lobster, shrimp with heads, fish with eyeballs....GAH).
5) fish skin. I keep seeing food network hosts waxing poetic about lovely crispy skin and i want to hurl. soooooooo gross.
6) giada de laurentiis...if she does one more episode where she puts two chopped vegetables with citrus zest and calls it salad, i will go insane. Celery and mushrooms are not salad. They are a soup base. Maybe.
7) Poached fruit in syrup. This is such a meh dessert.
8) Runny yolks. I can't order eggs when I'm out of the house because I'm TERRIFIED the yolk won't be cooked hard as a rock. Soft yolks skeeve me.

Kinda grumpy.....

on a mostly unrelated note (shameless self-promotion)

Pin It Now!

In my endless quest for fame and riches (since blogging is not so profitable when you refuse to run ads, lol), hubs and I have started up a little photography business.

www.darkroastphoto.com

Guaranteed anyone who books us will have FABULOUS shots of their wedding dinners, lol. ;)

Anyway, if you're in the market (in Ottawa), check us out. We specialize in photo-journalistic wedding photography. Things as they happen, how they happen, with a modern twist. I think we're pretty good. Here's a little taste to whet your appetite:

a wedding


another wedding


and a cute couple


Also, on a more related note, as soon as I get the pics uploaded, I've got a fabulous meal coming up - spiced couscous with african-inspired chicken stew. It was awesome.

Monday, November 24, 2008

indulging with flair

Pin It Now!

I've made no secret (EVER) of the fact that I love food. I love eating at home. I love eating out. I love it when other people cook for me.

I just plain love food.

And as much as I love reading about self-perpetuating scary economic headlines (i.e., the goverment says we're in for tough times for people stop spending money and hence cause the economy to come to a grinding, screeching halt), maybe it's time to eat out a little less and eat in a little more.

That does not, however, mean that eating in has to be a chore, or has to be second best. A nice simple meal shared with loved ones can be just as fabulous at home as it would ever be out in a restaurant. Snazzy kitchens are nice, but you don't really need one to create something fantastic.

I took my inspiration for Friday's dinner from two things I had on hand - a frozen bag of giant sea scallops and my container of quinoa of dubious age. The scallop techique is VERY simple, and it's one that works equally well with shrimp, chicken, fish or beef. You can't make a more simple or more wonderful sauce.

scallops and quinoa

The quinoa recipe yielded a LOT, but it's yummy. Next time I might halve it, but it's super delicious, so maybe not.

Saffron Quinoa Risotto
saffron on quinoa

For quinoa
2 cups quinoa (12 ounces)
1 1/2 teaspoons salt
2T olive oil
2T butter
freshly cracked black pepper
3 cups sliced cremini mushrooms
1/2 large red onion, thinly sliced
2 garlic cloves, thinly sliced
1 t ancho chile powder
1 cup dry white wine

6 cups broth (I used chicken, you can use whatever you like)
3/4 teaspoon crumbled saffron threads
1 c finely grated Parmigiano-Reggiano


Prepare quinoa:
1. Wash quinoa in 3 changes of cold water in a bowl, draining in fine-mesh sieve between changes of water. Return quinoa to bowl.

2. Bring your broth to a simmer with the saffron threads.

3. Heat 2 tablespoons butter and 2 T olive oil in pot over moderate heat until foam subsides, then cook mushrooms, onions and garlic, stirring and scraping up any brown bits from bottom of pot, until mushrooms are softened and exude liquid, about 5 minutes. (If mushrooms do not exude liquid, add 1/2 cup water to help scrape up any brown bits.)

creminis

4. Add quinoa and cook, stirring, 5 minutes. Add wine then simmer briskly, stirring constantly, until wine is absorbed, about 5 minutes.

risotto in the making

5. Add 1/2 cup broth to quinoa and simmer briskly, stirring constantly, until broth is absorbed. Continue simmering and adding hot broth, about 1/2 cup at a time, stirring quinoa frequently and letting each addition be absorbed before adding the next, until quinoa is tender and its germs separate from grains, about 30 minutes total. (There will be some broth left over.). At this point, add the ancho chile powder, as well as a hefty amount of salt (I didn't measure, because I kept adding fleur de sel by large pinches, but I would guess this recipe needed almost a TABLESPOON of salt to give it proper flavour. Taste it, and keep adding salt, a half teaspoon at a time, until YOU are happy with the taste.

6. Stir parmesan into risotto and season to taste (more pepper is always good).

This recipe was great when I made it (I used a couple of saffron threads as garnish) and it's also been great as leftovers. Unlike regular risotto, the quinoa doesn't seem to get gluey and nasty so it's a great option to make ahead. :) And also unlike real risotto, quinoa does NOT get starchy and creamy. If you want a more risotto like appearance, you can add heavy cream, but I really don't think the recipe needs it. It's quite yummy as is.

quinoa risotto

Seared Scallops with White Wine Cream Sauce

scallops

1.5 lbs sea scallops (big scallops, not teeny bay scallops)
fleur de sel
pepper
1.5 T olive oil
1.5 T butter
2 finely chopped shallots
1 t butter
1 c dry white wine (I like chardonnay...something with lots of flavour)
1 c heavy cream
salt, pepper to taste

1. Heat a cast iron pan over medium-high heat (you'll get MUCH better results with a cast iron or stainless steel pan than with a non-stick...non-stick will be okay, but the true flavour of this recipe comes from the sticky little brown bits...so it won't be as yummy if your pan won't stick at all).

2. Pat the scallops dry and season BOTH sides with some fleur de sel and fresh black pepper.

raw scallops

3. Heat the butter and olive oil together until the foam from the butter subsides. Add the scallops to the pan. Cook each side until it's nicely browned (about 3 minutes) and then flip. Scallops are done when they are opaque - you don't want to overcook them, and in fact, it's okay to even undercook them a weeeee bit.

seared scallops

4. Remove the scallops from heat and place them on your serving platter. Add the remaining butter and the shallots to the pan. Cook until the shallots JUST start to stick and turn brown at the edges.

the beginnings of sauce

5. Deglaze the pan with the white wine. Scape up all the good stuff with a metal spatula. The wine will bubble away furiously, then will stop bubbling as much (i.e., when the alcohol finishes evaporating). At this point, stir in the cream. Let the sauce bubble away until it's a more "sauce-y" consistency. Then pour over the scallops.

seared scallops in white wine cream sauce

YUM.

Piccata variation (excellent with chicken) - I made this the next night to have with the quinoa leftovers (piggies that we are, we scarfed down all the scallops). Sear 1.5 lbs pounded chicken breasts as with scallops. Keep warm in 350F oven. To shallots, also add 3 T chopped capers. When you add the wine, also add the zest of one lemon. Reduce amount of cream to 1/2 c and also add juice of one lemon. Season to taste with salt and pepper. It's very important to use 35% whipping cream or the lemon will curdle your sauce. This is also SUPER yummy.

These recipes are both keepers!!! I swear, you'll think you're at a cute little bistro when you dig into these. Enjoy and thanks for reading. :)

Friday, November 21, 2008

soup that will stick to your ribs

Pin It Now!

Considering the frequency with which I make soup, it is actually a little surprising that I'd never made a pea soup before.

I freely admit that I LOVE the canned sludge that is Habitant french-canadian pea soup. This is one of those foods that's kinda love or hate, but there's no denying that it essentially defined nearly a century of québécois cuisine(not the habitant brand, but pea soup in general).

Hémon immortalized it best in Maria Chapdelaine, but it was the daily fare for many a farmer in la belle province. It wasn't really a delicacy though - it was easily and cheaply made, from ingredients that would keep for a long time. In fact, in some of the poorer families, it would likely be once of the ONLY meals they would eat all winter.

And when your growing season is very, very brief, you need that kind of food. It's quite nutritious too - fibre, protein, etc.

Since I don't have to eat it day in and day out...well, I quite like it. Hubs, on the other hand, perhaps owing to some deep-seeded psychological holdback from his french-canadian ancestry, claims to HATE pea soup. Like completely and utterly hate it.

So I'd never made it before.

Wouldn't you know, now that I finally broked down and tried it out...hubs loved it. So much so that his facebook status now reads (hubs) "has never liked pea soup until Leslie made it." hehe. Even better, we were chit-chatting this morning, and the conversation went as follows:

hubs: you have totally won me over to pea soup. this is freaking phenomenal.
me: can i quote you on that?
hubs:on your blog?
me: yah
hubs: sure

So there he is, quoted. A testimonial from an avowed hater of pea soup. This soup takes a while to come together, but the actual labour involved is pretty minimal - it's great for a weekend or, if you're on mat leave (like me). Highly recommend this. Even if you think you hate pea soup.

Split-Pea Soup with Lentils
pea soup - not the fog kind

1 T olive oil
1 chopped onion
2 ribs celery, chopped
2 carrots, chopped
3 cloves garlic, minced
1 t dried thyme
1 t dried oregano
2L chicken broth (I used hot water and 4 25% less sodium chicken broth packages - it was plenty salty)
1 small smoked ham (mine was about 300g), take off the dark "rind" (don't throw it out though) and chop the rest into small cubes)
1 cup lentils, rinsed (use green or brown, NOT red)
1 cup dry green split peas, rinsed
2 bay leaves
lots of fresh ground pepper

1. In a large pot, heat the olive oil over medium heat. Add the onion, celery, carrots and garlic. Sauté for about 5 minutes. Add the thyme and oregano and cook 1 more minute.

base of soup

2. Meanwhile, rinse the peas and lentils. I just rinsed them together.

split green peas and brown lentils

3. Add the lentils and peas to the pot, toss to coat in the oil/veggie mix.

4. Add the chicken broth, bay leaves, and the rind of the ham (just cut it off in big pieces - this will help flavour your broth).

5. Bring to a boil, then let simmer for about an hour. Then, remove the ham rind, as well as the 2 bay leaves.

6. Ladle half of the soup into a blender. Before you turn on the blender, loosen the cap a tiny little bit (so the steam won't build pressure) and then cover it loosely with a tea towel (to contain splatters). You may also want to use an oven mitt on the hand that holds the tea towel on (hot soup is bad news).

7. Blend until smooth. Return to the pot with the remaining UNBLENDED soup - this gives it a nice thick texture, while still retaining the structure of some of the lentils/peas and veggies. Stir in the ham cubes and let simmer for another 10-15 minutes (or longer). Season to taste.

This is a great dinner for a chilly day - it's simple, it's healthy and, as you can see above, will make you a hero to a pea-soup-hating hubby.

Thanks for reading!

Thursday, November 20, 2008

yummy lasagna in my tummy

Pin It Now!

So, since I moved, I don't think I ever posted a pic of my new kitchen...I'm pretty sure the entire reason that this house won me over was because of the sheer size of the kitchen. I totally LOVE it. SO much counter space, so much cupboard space...LOVE. IT. I also love the giant patio door and the window above the sink that make it such a bright room during the day. Besides the pantry, my other favourite feature is the desk area - I like being able to search for recipes online, so it's perfect to have a kitchen computer. Great for blogging too. :)

my new kitchen

I still have a little work to do in improving it (check out the snazzy lighting...ugh), but it's such a great and inviting space to work in.


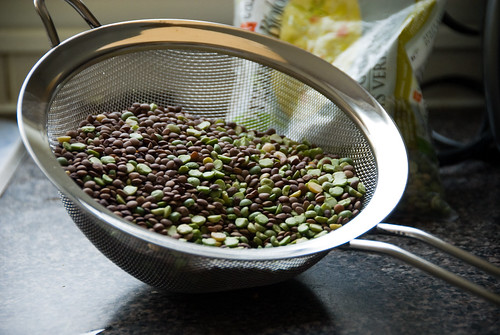
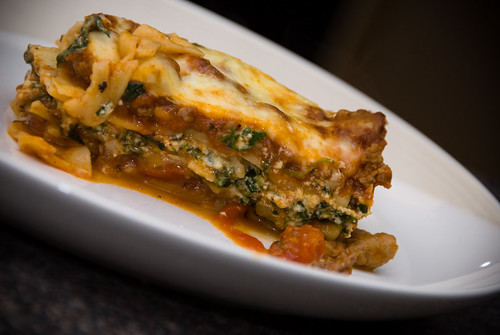
Now, about the food (i.e., the mess that's on the counter is actually my mise en place for lasagna making)...I don't think there's really such thing as an awful lasagna. Generally, when you get the combination of tomato sauce, cheese and pasta...it's probably not going to be bad.

I mean, it can be kinda bad, if you use those heinous oven ready noodles...but overall, it's hard to go wrong. So, while I definitely recommend this recipe (it was very yummy), I don't know if I can say it's really THAT much better than most of the other recipes out there.

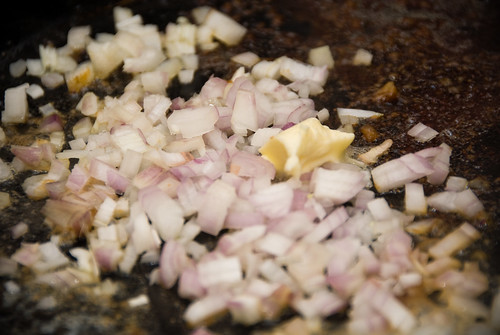
One thing I can say, however, is that you should never make just one lasagna. It's one of those dishes where with about 10% more effort, you can have 100% more food. Sounds like a good investment to me! The thing with this particular lasagna is that there is very little chopping involved - an onion, some garlic...that's about it. The rest of the effort is really more about just putting it together, and since it's not especially difficult to assemble, you should definitely consider making a second lasagna for your freezer.

I still don't like most frozen food, but lasagna is the exception - I find an uncooked lasagna freezes really well (just try to defrost it, if you can, before baking). I'm personally a fan of just defrosting it on the counter, but the bacteria police (who seem to think that bacteria will somehow grow on what is essentially a block of things that are all going to fine at room temp for a couple of hours....) will suggest that you defrost in your fridge. I don't like fridge defrosting...it's SO slow...but do whatever turns yourr crank.

This lasagna is yummy. If you make it, you'll like it.

Sausage, Spinach and Ricotta Lasagna
sausage, spinach and ricotta lasagna

Sauce:
8 oz light Italian sausage
8 oz extra-lean ground beef
1 c chopped onions
2 t minced garlic
1 t dried oregano
1 t dried basil
1/4 t dried red pepper flakes
1 jar (700 mL) pasta sauce
1 can (540mL) tomatoes with italian herbs, undrained, cut up (I use kitchen scissors in the open can)
1 T balsamic vinegar
1/2 t pepper

12 uncooked whole wheat lasagna noodles
2 c light ricotta cheese
1 package frozen chopped spinach, thawed and squeezed dry
1/3 c grated parmesan cheese
1 egg
1/3 c chopped FRESH basil
1/2 t salt
2 c packed shredded part-skim mozzarella cheese

1. Spray a 9x13 pan with cooking spray and set aside.

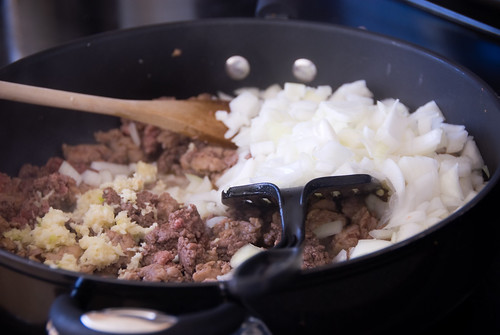
2. To make the sauce, remove casing from the sausage and break into small pieces in a large deep skillet (my 6 qt sauté pan was able to hold a double batch). Add ground beef, onion and garlic. Cook over medium heat until the meat is no longer pink. Stir in oregano, red pepper flakes and dried basil.

sausage fest

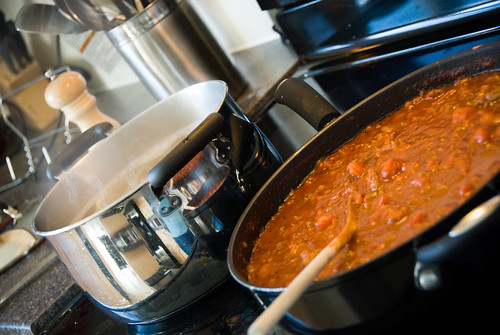
Cook 1 more minute. Add pasta sauce, tomatoes, vinegar and pepper. Bring to a boil, and then simmer until you're ready to use it (at least 20 minutes).

3. While the sauce is simmering, cook the lasagna noodles until they are BARELY done (about 8-9 minutes). They'll absorb some of the sauce liquid, so you want to make sure they still have a little texture to them. Rinse them REALLY REALLY well with cold water (or else they will stick together).

sauce and noodles

4. In a medium bowl, mix together the ricotta, spinach, basil, parmesan, egg and salt.

spinach, basil and ricotta filling

5. To assemble the lasagna, start with 1 cup of the meat sauce on the bottom of the 9x13 pan. Top with 4 lasagna noodles. Spread 1/3 of the remaining sauce over the noodles. Top with 4 more noodles. Add 1/3 of the sauce again, then add ALL of the ricotta spinach mixture. Top with 4 more noodles. Add the rest of the sauce and spread evenly.

one for now, one for later

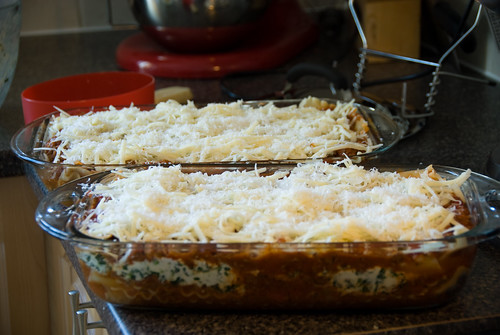
6. Top it all off with the grated mozzarella. I like to grate a little more parmesan on top of mine too.

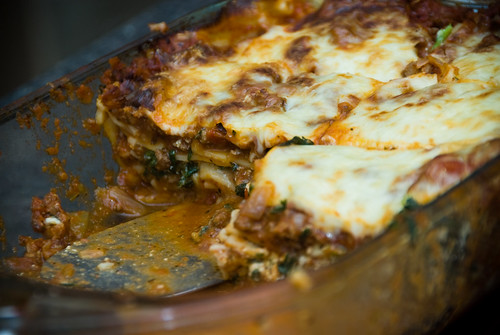
7. Spray some oil on a piece of foil and cover your lasagna. Bake at 375F for 35 minutes. Uncover and bake an additional 15 minutes. (I like to broil my lasagna for 2-3 minutes at the end so the cheese gets nice and brown). Let stand for about 10-15 minutes before serving (or it will be a soggy mess).

I served this to a crowd varying from teens to not-so-teens, and it was met with universal approval.

yummy

Dessert was SUPER simple. In fact, it was actually an afterthought. Lil Z was fussing like mad so I stuck her in the baby bjorn (similar to the picture below, but without the monkey suit, lol).

trick or treat...

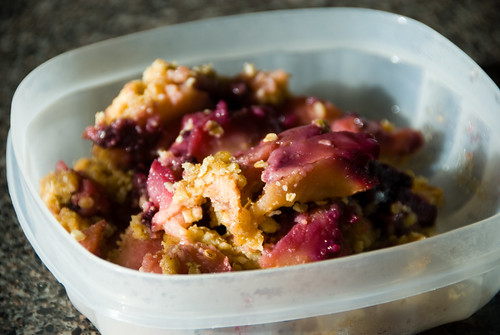
Since she shares my addiction to the food network, I thought she might enjoy watching me cook. We made an apple-blueberry crisp. I forgot to take a picture last night, but these are the leftovers I ate for brekkie today - it's quick, easy, and among the least-bad-for-you desserts you can make:

Last minute Apple Crisp
20081120-DSC_0056

6 apples (I had idareds that proved unsuitable for snacking due to mushiness)
1/3 c craisins (I happened to have them)
1/2 c frozen blueberries (again, had them on hand)
1/2 lemon

Topping:
3/4 c flour
1/2 c oats
1/2 c brown sugar
1 t cinnamon
1/4 t cardamom
4 T softened butter

1. Peel and core apples. Chop them. Z seemed quite fascinated by this whole process. Dump them in a greased pan (I used a 9x13 because I like to have a thinner layer of apples).

2. Sprinkle craisins and blueberries over top. Squeeze the juice from the 1/2 lemon over top.

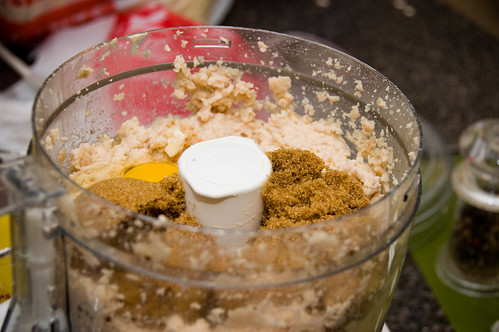
3. Combine the flour and the butter (I used a pastry blender). Stir in the oats, brown sugar, cinnamon and cardamom. Take about 1/3 c. of the mixture and combine it with the apples.

4. Dump the rest of the mixture on top and press into a sort of crust. Bake at 350F for about 40-45 minutes (until the apples are cooked).

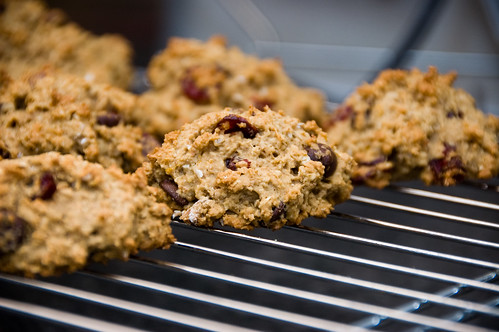
Yum. Very easy to put together, and odds are, if you have apples on hand, you can probably make an apple crisp. It's super forgiving too - you can change the ratios of things, add different spices...as long as there are apples and cinnamon involved...odds are that it will be yummy. The blueberries give it a nice purpley colour, so I always like to add them...they aren't necessary though.

Z seemed to enjoy her own personal cooking show, along with the witty narration and soundtrack (which included such top 10 hits as the alphabet and that stupid mini-wheats song that I can't stop singing to her because it always makes her grin...hehe). I've already started shopping for her first play kitchen...

thanks for reading!

Tuesday, November 18, 2008

should have thought this week's plan through a little better

Pin It Now!

I'm REALLY happy with my meal plan this week - it's yummy, it's healthy and I now have all of the ingredients for it.

However, tonight, I kinda feel like I encountered one of the downsides of meal planning. My salad was AWESOME, don't get me wrong...I loved every last bite of it. But I really could have gone for something a little warmer - a soup would have been a better choice.

Normally, I just switch my days around to have something suitable, but it didn't work so well this week...I was out all day, so the meal had to be speedy (i.e., not lasagna or pea soup). And I was saving the quinoa risotto and seared scallops for friday (and the scallops were still frozen).

So that meant that I had a caprese salad of sorts for dinner. SUPER yummy, but not quite what I was craving after a day of tromping around in the snow.

At any rate, this was a great meal. It's a side dish recipe, so the original recipe says it serves 5. As a meal, it serves 2-3 (it served us both good sized portions with two quite small lunch portions left over).

You can put it together in about 15 minutes, and it involves absolutely ZERO cooking. It would be a GREAT choice for a potluck, or for a summer BBQ, or just one of those hot nights when you don't wantt to cook.

The basil makes it....if you don't have fresh basic, make something else!!!!

caprese salad with chickpeas

insalata caprese with chickpeas

1 can chickpeas, drained and rinsed
1 pint grape tomatoes, halved
1 tub mini bocconcini balls, halved (my pack had 16 in it and I quartered them)
1/3 c minced red onion
1/3 c chopped fresh basil leaves
2 T olive oil
2 T balsamic vinegar
1 T lemon juice
1/2 t fleur de sel
fresh black pepper

1. Place in ingredients in a large bowl in the order listed.

flash batteries dying...

2. Mix well. Eat.

Pretty complicated, eh? Hubs loved it and is sad that I'm getting the lion's share of the leftovers. The chickpeas in it are great - full of fibre and protein. They really 'flesh' out this salad and make it a satisfying meal. Adding a slice or two of grilled garlic bread would be yummy too!

However, hubs eschewed his super yummy pad thai lunch today in favour of MCDONALDS (meaning I'm totally going to win our game, hehe).

Thanks for reading - tomorrow I"m making two lasagnas - one for the table and one for the freezer. Stay tuned.

Monday, November 17, 2008

thai goodness

Pin It Now!

Hubs and I are playing a game.

We are playing the Biggest Loser...of sorts.

My post-baby physique is decidedly, um....rounder than it was before. Can't say I'm a big fan of it.

So the game is on, and the healthy food is in. I've got a great healthy meal plan for the week (hopefully a more successful one than the last one I posted) and I am going to kick his butt, and hopefully also get rid of the nasty case of muffin top I've developed.

Tonight's dinner was pad thai with shrimp and tofu. Unfortunately, my picture shows NEITHER the shrimp nor the tofu...oops. I stole this recipe from Eat, Shrink and Be Merry, and just modified a few things due to packaging size (I'm not going to use 1 cup of tofu when I had to open a 1lb package) and ingredient availability (ran out of fish sauce after 1.5 T and was short on lime juice!).

This was yummy. I made mine a bit spicy, as capsaicin is supposed to be good for the metabolism, and I just, frankly, like it that way.

I think you'll like it too, even if my picture fails utterly.

Pad Thai

pad thai with shrimp and tofu

Sauce:
2 T lime juice
2 T fish sauce
2 T oyster sauce
3 T ketchup
3 T soy sauce
2 T brown sugar
1 T sri racha (spicy chili garlic paste)
1 T grated ginger
1 t sesame oil
1/2 t crushed red pepper flakes
4 crushed garlic cloves

8 oz rice stick noodles (about 1/4 inch wide)

2 t canola oil
1/2 c. thinly sliced red onions
1 red pepper, thinly sliced
1 lb shrimp, peeled and deveined
1 lb extra-firm tofu, diced (I actually briefly marinated my tofu in some soy sauce, and hoisin sauce to give a little more flavour)
2-3 cups bean sprouts
1/2 c chopped green onions
1/4 c chopped fresh cilantro
1/4 c chopped peanuts

1. First, prep ALL of your ingredients (chop the red pepper, peel the shrimp, chop tofu, peel garlic, peel ginger, etc.). This dish cooks SUPER fast and you don't have much time to chop once you start.

2. To prepare sauce, combine lime juice, fish sauce, oyster sauce, ketchup, brown sugar, ginger, soy sauce, sesame oil, sri racha, hot pepper flakes and garlic in a medium bowl. Set aside. DON'T SNIFF IT. Fish sauce stinks. It tastes good but smells like rotting fish. It WILL taste good.

3. Place rice noodles in a large bowl and pour boiling water over top. Let soak 7 minutes. Drain and rinse well in cold water (while the rest of your stuff cooks, periodically, just toss the noodles around a bit with your hands...it will keep them from becoming a gluey ricey noodley mess).

4. While the noodles are soaking, heat canola oil in your biggest non-stick wok/skillet over high heat. Add onions and red pepper, cook about 3-4 minutes. Add shrimp and tofu and stir-fry until shrimp are just done (3ish minutes).

5. Add rice noodles (I like to drop them in small clumps over the dish), then add the sauce, bean sprouts, green onion and cilantro. Toss and cook until hot (1 minute or so). Add peanuts and toss again. Stir immediately.

I really like this version - it was not as sweet as most (I find a lot of pad thai recipes to be almost cloyingly sweet....the lime really cuts through here) and I loved the spice level. Hubs approved heartily, so hopefully the fact that he ate seconds means I will win.... :)

Plan for the rest of the week:
Tuesday - caprese salad with chickpeas
Wednesday - italian sausage lasagna with spinach and ricotta
Thursday - smoked ham and split pea soup (homemade)
Friday - mushroom quinoa risotto with seared giant sea scallops

Thanks again for reading!!!

beans and cookies totally go together

Pin It Now!

I'll admit it...I regularly hide beans in places where no bean has gone before (hmmm....in reading that....it kinda sounds twisted...totally not meant in a twisted way). ANYWAY, I put beans in curries, in lasagna and all kinds of places...it hadn't yet occurred to me to put them in cookies...and this is brilliant. Beans, so it seems, can take the place of most of the fat in cookies.

So instead of artery-clogging, calorie-rich, fatty goodness, you get a nice dose of protein and fibre.

Sweet.

I stole this recipe from Morgan, who in turn stole it from someone else.

And trust me, it's definitely worth stealing.

These cookies are easy to make (courtesy of the food processor) and are super yummy. The serving size is generous and they do make a great breakfast. I'd suggest using mini chocolate chips if you have them...the big ones are tasty, but the small ones distribute a little better...

Breakfast Bean Cookies

super healthy cookies

2 cups oats (I used large flake)
1 cup whole wheat flour
1 tsp baking powder
1 tsp baking soda
¼ tsp cinnamon (optional)
¼ tsp salt
one 19-oz (540-mL) can white kidney or navy beans, rinsed and drained
¼ cup butter, softened
1 cup packed brown sugar
zest of one orange
1 large egg
2 tsp vanilla
½ cup chocolate chips
½ cup raisins or dried cranberries
¼–½ cup chopped walnuts or pecans
2–4 Tbsp ground flaxseed (optional)

Preheat the oven to 350°F.Place the oats in the bowl of a food processor and pulse until it resembles coarse flour. Add the flour, baking powder, baking soda, cinnamon and salt and process until combined. Transfer to a large bowl.

Put the beans into the food processor and pulse until roughly puréed. Add the butter and process until well blended. Add the brown sugar, orange zest, egg and vanilla and pulse until smooth, scraping down the sides of the bowl.

You can see the bean puree in this pic:

making cookies

Pour the bean mixture into the oat mixture and stir by hand until almost combined; add the chocolate chips, cranberries, nuts and flaxseed and stir just until blended. Drop large spoonfuls of dough onto a cookie sheet that has been sprayed with non-stick spray, and flatten each one a little with your hand. (I find this works best if I dampen my hands first.) Bake for 14–16 minutes, until pale golden around the edges but still soft in the middle. Transfer to a wire rack to cool.

Makes 2 dozen cookies.

These were great. We shot a very very rainy wedding on Saturday and these kept us going all day! Highly recommend the recipe. They are fabulous because they are yummy and super good for you, but they don't have a crazy indulgent kind of taste, so you're not as likely to eat the whole batch.

I mean, I could be the only one who regularly eats entire batches of baking...but I'm just sayin....

Thanks for reading!

okay, so blogging seems to be a bit of a struggle...

Pin It Now!

...but I'm still cooking and have tons of yummy things.

If you can deal with a little less commentary (and come to think of it, I'm probably the only person who reads it anyway), then I can provide more culinary amusement for you.

Meal planning last time was a complete and utter bust - I don't know what I was thinking, trying to do a meal planning post the week before thanksgiving. Holidays screw everything up - simply because there ends up being so much to do around the holiday that regular dinner plans go out the window!

Even better, I had an amazing dinner party menu all ready to do (and the food half made) when I came down with a rotten cold and had to cancel.

Oh well, at least hubs and I enjoyed the two pounds of parsnip fries and three dozen stuffed mushrooms I'd already prepared for the occasion, hehe.

I hosted a lovely group of ladies and babes last week for tea and sandwiches. There was also cake, but I'll tell you more about the cake later. I had a couple of requests for my tuna salad recipe, so here goes:

best sandwiches ever

3 cans tuna (I use flaked light tuna as I am cheap and don't like mercury)
1/3 c. olive oil
1 T balsamic vinegar
2 T red wine vinegar
pinch fleur de sel
fresh black pepper
3 T dijon mustard
1/4 c. each of finely chopped: celery, roasted red pepper, sundried tomato
2 T finely chopped capers
1 finely chopped shallot

Mix it all together, and you have awesome tuna salad. I served on fresh homemade whole wheat baguette with cheese and tomato. The other sandwich I made was even simpler - bottom of the baguette spread with (purchased) hummus. Top of the baguette spread with (purchased tzatziki). Then chopped red pepper, green pepper, tomato and cucumber.

The other trick is to hollow out the baguettes a bit so the sandwiches stay together nicely. I made up four baguettes worth (24 sandwiches). The ladies didn't eat too too many, but hubs and I did a pretty good number on 'em.

I have two more quick little recipes coming tonight...stay tuned...

Related Posts with Thumbnails