Photobucket - Video and Image Hosting

Monday, December 29, 2014

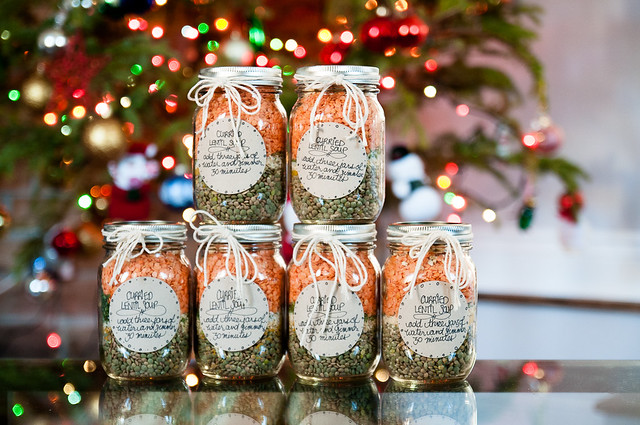
the perfect gift in a jar - curried lentil soup

Pin It Now!

mason jar gift - curried lentil soup

Most good bloggers have wonderful editorial schedules where they publish stuff like this at a time when it will actually be useful (i.e., before Christmas).  I am not one of those bloggers.  Like so many people, I spend the weeks leading up to Christmas running errands, gift shopping, gift wrapping labeling (hubs does the wrapping), making food for the umpteen million potlucks and meals, and attending the zillions of Christmas gatherings.  So I focus on doing rather than writing/posting about doing.

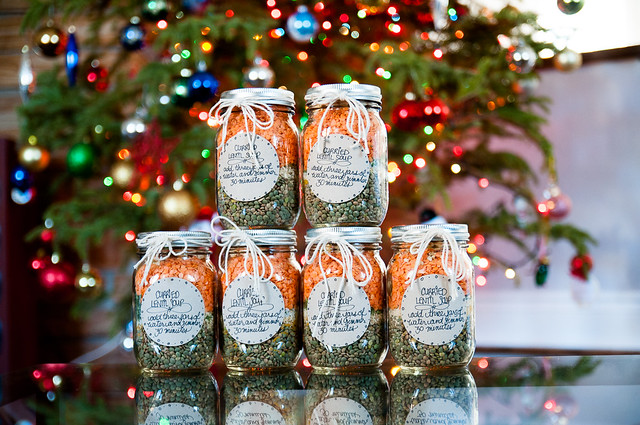
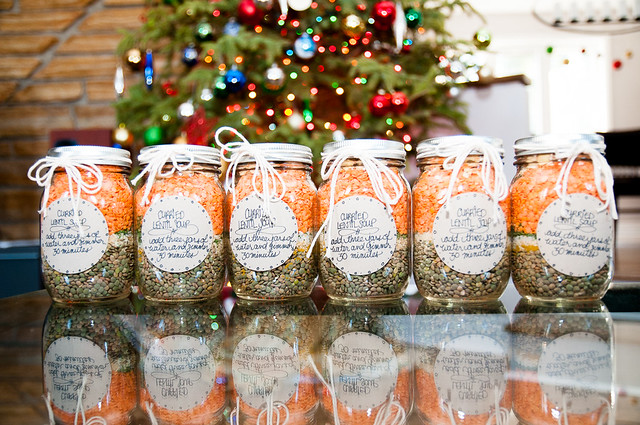
Now that things have calmed down a bit, and I have a few minutes, I wanted to share a gift that I've made for friends/family/co-workers for the last two years.  These soups in a jar are great for so many reasons.

mason jar gift - curried lentil soup

I've done gifts in a jar before (these cowgirl cookies at Christmas a few years ago) and while they are cute, I feel like they aren't the greatest gift to give because they are more about making ME look good than doing something nice for the recipient.  Because making cookies in a jar is actually work, and you need to buy more ingredients (i.e., eggs, butter, milk), and do work.  I don't want to make work for busy people.  I want to SAVE them work.

And also, frankly, the last thing people need after Christmas is more sugar-laden baking.

So enter lentil soup.  I came across the initial recipe on the Good Housekeeping website, but the proportions didn't work right for any of my jars, and it was way too salty.  So I adjusted the proportions a bit and have come up with a great adjustment to the recipe that fits perfectly in 500 mL/2 cup mason jars.  You can easily double it for 1L mason jars, but then it makes a lot of soup, and in keeping with the idea where I want to make people's lives easier, I want to give them just enough to enjoy, but not so much they are overwhelmed with a huge amount of leftovers.

This recipe is awesome.  It's very simple, with no super-processed ingredients.  It's suitable for many different dietary needs (it is naturally gluten-free and nut-free, as well as vegan...though I purchase my ingredients at Bulk Barn, so I would not personally guarantee that *MY* jars are nut-free; if allergens are a concern, you should purchase sealed packages of ingredients that are labeled appropriately).

But best of all, the soup is completely easy for the recipient to make and it tastes fantastic.  I made 17 jars last year.  This year I made 39.  Who knows what next year will bring?

IMG_20141213_235056
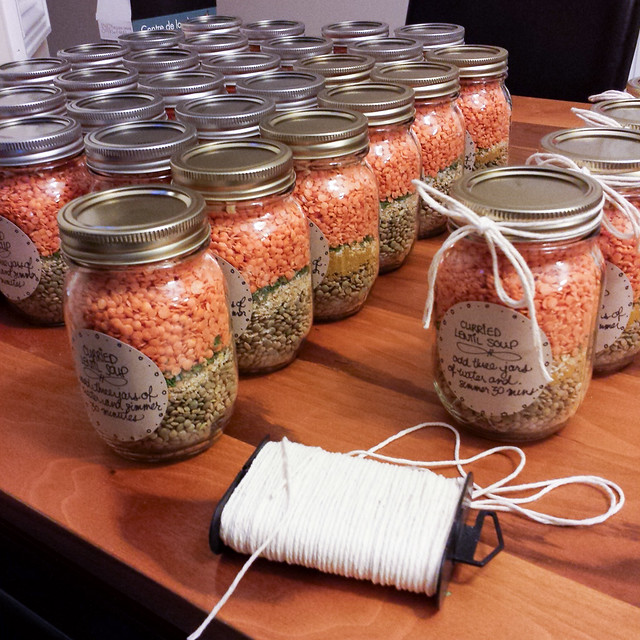
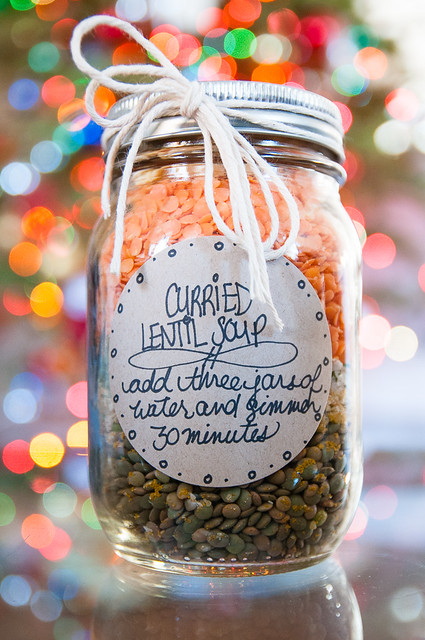
I seem to have this terrible habit of unintentionally destroying printers, so I hand-wrote all my labels, and then just decorated the jars with some butcher twine.  It's simple and rustic, and I think it looks nice.  You could go full-Martha on this if you had the time and inclination.

mason jar gift - curried lentil soup

Lentil Soup Mix in a Jar (this will perfectly fill a 500 mL mason jar)
(modified slightly from Good Housekeeping)

6 oz green lentils (just under a cup)
1 T curry powder
3 T dried minced onion
1/2 t garlic powder (I brain-farted and put 1t in all of mine....they are still good!)
1 T dried parsley
1 t kosher salt
5 oz red lentils (just under a cup)
2 T chopped dried apple

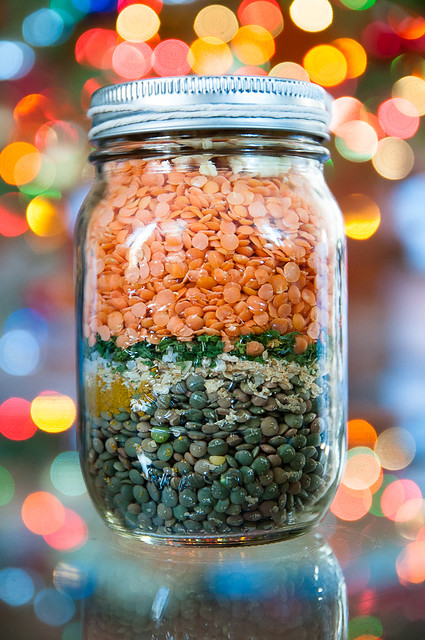
 1. Layer ingredients.  I like to put green lentils on the bottom, followed by seasonings, then red lentils, then as much chopped apple as I can fit under the lid.

mason jar gift - curried lentil soup

 2. Cooking instructions - add three jars of water and simmer 30 minutes (this instruction works no matter how you scale the recipe - 6 cups of water for a 500 mL mason jar, or 12 cups for a 1L mason jar).

Some lentils may need to simmer a bit longer, and people may want to puree the soup a bit (or add more water if they want a thinner soup).  But the basic instruction is so simple and requires no extra ingredients and just one pot.

TIP: dried apples rings are a pain in the butt.  I drop mine into a running food processor a few at a time.  If you aren't making a zillion jars, you could just hand chop them, but they are TOUGH.

If curry is not to your liking, here are a few alternate suggestions (omit the curry for all of these):

classic French - 2 t herbes de provence

italian - 1 t italian seasoning (or mix of basil, rosemary and oregano), 2 T chopped sundried tomatoes in lieu of apples

moroccan - 1/2 t cinnamon, 1/4 t cardamom, 1/2 T cumin, dried cilantro in lieu of parsley, dried raisins and apricots in lieu of apples

southwest/mexican - 1 T chili powder, dried cilantro in lieu of parsley.  Omit apples

So better late than never.  Pin this one for next year!  Or just make up a couple of jars for yourself to keep in the pantry for busy nights.

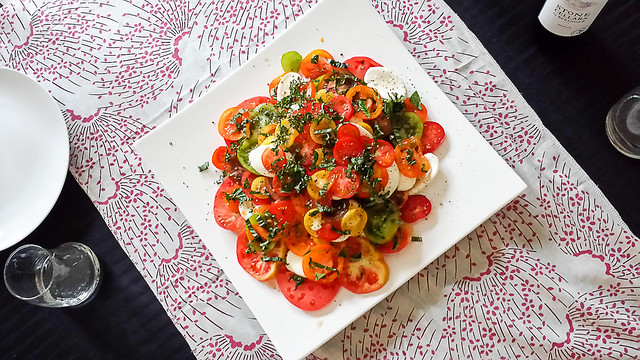
And might I suggest you pair the soup with a quick salad and this fantastic five-minute focaccia for a deliciously satisfying meal.


mason jar gift - curried lentil soup

Monday, October 20, 2014

ghoulish monster pasta - fast and easy hallowe'en dinner

Pin It Now!


ghoulish monster pasta

For the last few weeks, I've become more and more interested in the blog and forum surrounding Mr. Money Mustache (I added a link, so you could go check it out).  While I'm unlikely to ever consider myself mustachian (and frankly, probably also too materialistic), I've really found a lot of sense in his advice and commentary about consumer spending.

ghoulish monster pasta

And that in turn has led me to examine my own spending a little more closely.  And I've realized that, just like so many others, that I do a lot of impulsive and completely unnecessary spending (exhibit A, my shoe collection, exhibit B, my dress collection, and exhibit C, my extensive kitchen gadget and serveware collection.

ghoulish monster pasta

So I'm trying to be a lot smarter about expenditures.  I don't have any dreams of retiring at 40 and being financially independent at that point (read the MMM blog for more of that type of inspiration, because you are unlikely to find it here), but I just wanted to talk about some of the smaller decisions I've made lately to reduce impulsive and unnecessary spending.  :)

ghoulish monster pasta

I've been in contact with Raise.com regarding Hallowe'en related post that mentioned their service, and I was kind of scratching my head as to how to link both Raise.com (a gift card buy and sell site) and Hallowe'en, and also rationalize this under my newfound frugality.  I'm not sure I'm succeeding, but anway. (As an aside, I will start with a bit of bad news first, for my Canadian readers, Raise.com is not currently able to process international orders (that said, you can check out the similar Canadian service of CardSwap.ca)).

I actually find this idea quite frugal - essentially, if you find yourself with a gift card you can't use, rather than buying something you don't actually need, you can sell it.  Likewise, if you're planning to spend money in a given store, you can acquire a giftcard for that store at a discount (which, combined with whatever other offers you can find for that store, can offer you a pretty great deal, particularly when it's money you planned/needed to spend anyway).  I spot a TON of Home Depot gift cards on the site, and saving an additional few per cent off home improvement materials strikes me as a good deal for sure.

ghoulish monster pasta

Of course, it's not a great deal if you spend money you either don't have or didn't plan on spending.

Anyway, so how exactly do we link this to Hallowe'en??? Well, the thing is, I had some ideas for a fun Hallowe'en dish; one that would be super simple to put together and quick enough to get on the table between getting home from work/school and trick or treating, but that would also offer a little bit of fun.

ghoulish monster pasta

This black monster pasta was a HUGE hit with our entire household.  I happened to have the black pasta on hand already (President's Choice Black Label), but will admit it was a total impulse purchase and quite expensive compared to typical pasta; this dish would work equally well with white or whole grain pasta, though I did find the black noodles especially ghoulish.  I also had some of my favourite pesto from Costco on hand, so I used that up (though again, a tomato sauce or cream or rose sauce would also work just as well).  But you have to admit that the green pesto on the black noodles is great for that extra gruesome touch.

ghoulish monster pasta

The 'magic' of this dish is in the eyes.  And initially, I thought I would just purchase some of that thinly sliced cheese (the type sold for sandwiches) and maybe pick up a cookie cutter of some sort to cut it out.  And this is where I heard the voices of frugality in my head.  Pre-sliced cheese is INSANELY expensive (especially when you look at the cost by weight).  And it's ridiculous to buy a cutter for the sole purpose of making a single dish.

ghoulish monster pasta

So I just used mozzarella I had on hand (it was a bit of a pain to cut, as evidenced by the slightly ragged edges) and I cut it with a round tablespoon measure.  And you know what?  It totally worked, and though my photos are maybe not quite as cute as they otherwise could have been, the kids sure did love this pasta.  Pesto is almost always a hit in our house, and the bit of fun with the eyeballs and mouth completely made them giggle and the kids were super excited to eat it.

ghoulish monster pasta

I think they had the most fun talking about the various expressions of the monsters, and experimenting with the various positions of the red pepper mouth.

ghoulish monster pasta

For balance, I served with a nice green salad.  Because vegetables.

ghoulish monster pasta

monster pasta
serves 4-6 (it served our family of four, plus two generous lunches)
ghoulish monster pasta

1 450-500g package pasta (ideally black, but any kind will work)
olive oil
salt
pepper
1/2 c pesto (or other sauce)
white cheese
capers
red pepper

1. Cook pasta according ot package directions.

2. Meanwhile, take thin slices of the cheese, and cut out two circles for each serving.  You want the circles to be about 1" in diameter.  Give or take.  Slice rings from your red pepper, and cut each in half.  I left some of the inner white portion attached because I liked how it gave the monsters character.  I think I may have put too much thought into this.

3. Once you drain the pasta, you can toss it with a touch of olive oil, salt and pepper.  I like to, but it's not necessary.

4. Add the pesto and stir it in.

5. For each serving, top with two circle eyeballs, and then add a caper on top of each.  I made sure that hubs' monster was rolling its eyes. Art imitating life and all that.

6. Add a pepper slice for the mouth.

And you're done.  It's crazy easy.  I know there are much fancier hallowe'eny meals out there, but the beauty of this one is that you actually have the time and ingredients to make it.  Or you can improvise (don't have capers?  Don't buy them just for this.....use olive rings or pickle slices, or anything you can find that gives your monster just that perfect haughty expression.  You could even use tofu instead of cheese, if you wanted).

So all this to say, I'm trying to quiet that little voice in my head that makes me want to go all spendy, and though I made only a couple of small choices regarding this dish, those are the types of small choices that can keep adding up.

ghoulish monster pasta

I think a service like Raise.com (or Cardswap.ca for my Canadian readers) is a great way to get money for something you don't need, and also to get a great deal on your planned spending.

I'm also going to go one step farther and recommend you try to find your local Buy Nothing group.  These are great hyper-local gifting communities - so far I've found that it's a fabulous way of getting rid of things I no longer need, but that are not likely to sell, and you never know what you might come across (though I'm still looking to see if anyone's wanting to get rid of an old tortilla press.....I've banned myself from buying additional gadgets that will be infrequently used, but hey, if someone has one gathering dust......).

ghoulish monster pasta

Cheers - happy selling and gifting and trick or treating.  :)


Thursday, October 16, 2014

orzo with shrimp, feta, summer squash and vermouth

Pin It Now!

shrimp and orzo bake with feta

This is a super simple dinner that I made a while back.  I had meant to share this ages ago, but life being what it is, I got distracted and didn't get to it.

shrimp and orzo bake with feta

So now is the time.

shrimp and orzo bake with feta

This dinner came about because I had some shrimp, feta and fresh organic vegetables from Bryson Farms that needed to be used, and in my googling/pinteresting, I came across this recipe from epicurious, that looked like a great base.

shrimp and orzo bake with feta

The original doesn't call for much in the way of vegetables, which is honestly a problem that I find with a lot of casseroles.  Personally, if I'm going to get everything together in a big dish and bake it, I want to have enough vegetables contained within it that I don't feel guilty if I can't muster my schmidt together enough to make a salad or veggies on the side.  So I almost always add more veggies, and it almost always works out well.

shrimp and orzo bake with feta

In this case, I used fresh tomatoes in lieu of canned, and also added mushrooms and summer and pattypan squash.  They were great!  And the whole casserole had fantastic flavour, so I would recommend this.  Orzo could easily be substituted with rice or quinoa or millet if you preferred.  I have a weakness for orzo though.

shrimp and orzo bake with feta


Orzo with shrimp, feta, zucchini and vermouth
modified from epicurious
serves 6

shrimp and orzo bake with feta

8 ounces orzo (rice-shaped pasta - this is about a 1/2 package)
6 tablespoons olive oil
1 cup crumbled feta cheese
1/4 cup freshly grated Parmesan cheese
2 T dried basil (fresh would be better, but I didn't have any)
1/2 lb mushrooms, chopped
1 lb summer squash/zucchini, diced
1 pound uncooked medium shrimp, peeled, deveined
2 garlic cloves, chopped
14 1/2-ounce can diced tomatoes in juice (I just weighed out 16 ounces of chopped fresh tomatoes)
1/2 cup dry vermouth (or white wine)
2 teaspoons dried oregano

1. Preheat oven to 400°F. Brush 11x7-inch glass baking dish with oil.

2. Cook orzo according to package directions. (when I have time, I like to toast the orzo first --> you can see the technique in this recipe). Drain well and return orzo to same pot. Add 2 tablespoons olive oil, 1/4 cup feta cheese, Parmesan cheese, and 1 T basil and stir.

3. Arrange orzo mixture in casserole dish.

4.  Heat 2 tablespoons oil in large skillet over medium heat. Add shrimp and sauté until slightly pink, about 2 minutes (shrimp will not be cooked completely). Arrange shrimp on top of orzo.

5. Add remaining 2 tablespoons oil to same skillet. Add mushrooms and summer squash/zucchini, garlic and sauté over medium-high heat for 2-3 minutes. Add tomatoes with juice; cook 1 minute. Stir in vermouth and oregano and remaining 1T basil.

6. Simmer uncovered until the tomatoes start to break down about 5-7 minutes. Season sauce to taste with salt and pepper; spoon over shrimp. Add a sprinkle more parmesan.

7. Bake orzo until heated through, about 10 minutes. Sprinkle with remaining feta.

shrimp and orzo bake with feta

This is so simple to make and is delicious.  It could easily be modified to suit what you have on hand - chicken would work (though make sure it's cooked first), and you could mix up the vegetables to include peppers, fennel, eggplant, etc.  This would also be good with goat cheese instead of feta (if you like goat cheese.....which I don't), and I think black olives would probably be a great addition too.

Hope you enjoy!  Thanks for reading.  :)

Thursday, October 09, 2014

peanut butter cookie dough bites from Oh She Glows

Pin It Now!

Ever since I discovered these chocolate chip cookie dough bites, I have been hooked on the concept.  These things are so simple to make (essentially, drop everything in a food processor, combine, mix in some chocolate chips, then roll), and they are incredibly delicious.

vegan peanut butter cookie dough balls

And when you look at the ingredient list, you can actually feel pretty good about enjoying a ball or two with your afternoon coffee - the perfect little pick-me-up to get you through to dinner.

vegan peanut butter cookie dough balls

This recipe is not my own (though I did change the method a bit due to my laziness) - it actually comes from the Oh She Glows cookbook, which is a fantastic book from one of my favourite bloggers.  I am normally hesitant to add to my already too-extensive cookbook collection (especially when the internet is rife with recipes), but I received this one as a birthday gift.

And I have to say, it's an awesome addition that deserves every to be on every shelf.  I've tried quite a few recipes (tex-mex casserole and glo bars) and they have all been fantastic.

These cookie dough bites were a HUGE hit with my mini-foodies and with me too.  Delicious flavour and a wonderful treat to have with an afternoon coffee.

peanut butter cookie dough bites
(from Oh She Glows cookbook; method modified due to laziness)

peanut butter cookie dough bites
1 1/2 cups rolled oats
2 T coconut oil, melted
2 T smooth natural peanut butter
1/4 cup maple syrup
1 t vanilla extract
 1/2 cup almond meal
 1/4 tsp sea salt
 2 tbsp dark chocolate chips

1. Blend the oats in a food processor until they have a flour-like consistency.

2. Add the coconut oil, peanut butter, maple syrup, vanilla, almond meal and salt, and process until the mixture is combined (you don't have to go crazy to make it perfect - just get it to combine.

3. Scrape the batter out of the food processor and into a bowl, then add the chocolate chips. Fold them in to combine.

vegan peanut butter cookie dough balls

4. Roll into balls (I made mine smaller and it made about 25).  Freeze bites for 5-10 minutes (until firm) and store in the fridge.  You can store in the freezer, but they are a bit hard to eat.

So yummy!!!!!!


Tuesday, October 07, 2014

quick and easy chicken fried rice

Pin It Now!

Fried rice is a staple meal in our family - whether I make it with turkey, chicken, egg, pork, tofu, etc., it's a relatively healthy meal that is a real hit with the whole family (mind you, the kids will still sometimes pick out the various aspects they dislike).

quick and easy chicken fried rice

I love making this whenever I have any sort of leftover protein (roast chicken in this case, but I most often make it with leftover turkey), but the beauty of this type of meal is that you can make it work with almost anything that you have on hand.  I like to make mine a bit healthier by using brown rice, and packing it full of vegetables.  I also love putting egg in it, so as long as I have eggs on hand, that's what I do.

quick and easy chicken fried rice

If you're smart and organized (i.e., all the things I'm not), you can make your rice in advance (and even freeze it) and I'm told fried rice is better that way.  And I'm sure purists would be appalled at my use of brown rice, but I like to add a little fibre in wherever I can sneak it.

quick and easy chicken fried rice

This particular time, I used this Planet Rice sprouted brown rice I picked up at Costco a while back.  I like that it cooks in 25 minutes (rather than 45 for traditional brown rice).  As long as you start the rice first, you can get this on the table in about 30 minutes or so.

quick and easy chicken fried rice

quick and easy chicken fried rice

quick and easy chicken fried rice

2 c uncooked brown rice (cook according to package directions)

1.5 T canola oil
1.5 T sesame oil

3 eggs, lightly beaten

1 onion, chopped
2 cloves garlic, chopped
1 T ginger, minced/grated
200 g mushrooms, roughly chopped
1 yellow pepper, chopped
1 large head broccoli, chopped in small pieces (I had a few smaller heads)
1 c frozen peas
2-3 c chopped chicken (or turkey or tofu or whatever)
1/4 c soy sauce, divided

1. Start the rice.  I recommend a rice cooker, if you have one. Start chopping your veggies.

2. Take your largest saute pan or wok (I have a huge 15" wok from Cool Kitchen Pro, which is fantastic), and heat it over medium heat.

3. Add the oil, let it heat until shimmering (but not smoking), and then add the eggs.  You could scramble the egg, but I usually just let it cook in an omelette and chop it up later.

quick and easy chicken fried rice

4. Flip the omelette, cook until just done, then remove the egg from heat and set aside.  You should still have plenty of oil in your pan (if you don't, then add a splash more).

5. Add the vegetables (minus the peas) to the pan, and stir-fry for a few minutes, until they are lightly done.  Add the chicken and the frozen peas, and cook 1-2 minutes more.

6. In terms of adding soy sauce, I find it easiest to add some to the chicken/veggies and some to the rice, and then combining them together.  So do that.  Or you can dump everything in together and stir.  It's not rocket science, but it is pretty delicious.

This makes 6-7 servings.  It served our family of four, plus two lunches, plus another large container full.  You can stretch it a bit more by adding more rice (2.5 cups instead of 2, or even 3 cups if you wanted), but as I said, I like to keep it packed with veggies to keep it from being too carb-heavy a meal.

Enjoy!

  quick and easy chicken fried rice

Tuesday, August 26, 2014

helloooooo summer (shrimp skewers and grilled veggies)

Pin It Now!

After the most epic, dark and cold winter in recent memory, I am completely embracing the warmth.  Spending lazy afternoons outside with the kids, lazy evenings reading on the patio and many a delicious dinner cooked on the grill.  If only it were actually a bit warmer this summer.  But whatever.

honey-garlic-cilantro shrimp skewers and grilled veggies
I remember when I used to think that meat was the only thing that you could grill, but I've since been introduced to a whole wide world of grilled vegetables and fruit (I haven't quite made it to grilled pizza yet, but it's on my list!).

Dinner these days often consists of me prepping a basket of veggies, some sort of protein, and having some sort of starchy side for the kids and hubs (rice, potatoes, quinoa, etc.).  It's simple, but it's SO good.

These shrimp skewers came about because I had shrimp on hand, and rather than grilling it plain, I decided to dress it up with something.  And I ran out of time to marinate it.  So this is really quick and easy and requires no advance planning (which is perfect for the lazy mood of summer).

As for the veggies, I've yet to find a veggie combination that wasn't somehow made more delicious through grilling - I recently picked up spray coconut oil from Costco, so I spray my basket, load it with veggies (make sure the slower-cooking [i.e., denser] veggies are cut smaller) and then for the last five minutes of cooking, I dress the veggies with some sort of seasoning (ponzu, in this case).  I kept the broccoli larger, because I prefer it almost raw, as do the kids, and I sliced the carrots super thin on my mandolin, because otherwise I find they just don't cook very well on the grill.  Last, peppers and onions are always great - just have to make sure I cut them large enough so they don't fall through the cracks.  I spray a bit of extra coconut oil on the veggies too.

honey-garlic-cilantro shrimp skewers
honey-garlic-cilantro shrimp skewers and grilled veggies

1 lb raw shrimp (larger is better, but smaller will work)
1/2 c chopped cilantro
2 large cloves garlic
3 T honey
2 T olive oil
2 T lemon juice
1/2 t salt
pepper to taste

1. Thaw your shrimp and peel it.

2. Thread it onto skewers (ideally, if you plan ahead, soak them if they are wood....but charred ends never really hurt anyone...)

3. Preheat your grill to medium-low (this keeps your skewers from charring)

4. Meanwhile, in some sort of mixing appliance (I used a measuring cup and an immersion blender, but any blender, food processor, magic bullet-type deal will work....alternatively, chop everything as fine as you can), combine the cilantro, garlic, honey, olive oil, lemon juice, salt and pepper.  You can taste it if you want, but given that it's just a glaze, it's pretty intense and not that enjoyable on its own!).

honey-garlic-cilantro shrimp skewers and grilled veggies

5. Put your skewers on the grill, and brush with the glaze (you could marinate it in the glaze as well, if you're planning/prepping in advance).  Grill for about 3-4 minutes per side (which will depend on the size of your shrimp - they are done when they are opaque all the way through), and when you flip them, brush the other side with glaze.  Flip at least one more time (you will have cross-contaminated your shrimp if you dipped in the same bowl and used the same brush as you did on the raw side....and foodborne illness will definitely kill the patio buzz....so cook thoroughly!

Enjoy - they are really delicious!


honey-garlic-cilantro shrimp skewers and grilled veggies


Simple grilled vegetables (barely a recipe because you can substitute everything)

1 head broccoli, cut into florets
2 medium carrots, cut thinly
1 red onion, chopped coarsely (so it won't fall through the grill basket)
1 red pepper, chopped coarsely
cooking spray or oil with brush
seasoning of choice (I like ponzu)

1. Spray your grill basket or brush it with oil.
2. Chop veggies and combine, and you can either drizzle or spray a bit more oil.
3. Grill, stirring every couple of minutes (like a stir-fry) and when the veggies are close to done, sprinkle about 2-3 T of your favourite seasoning (soy sauce, ponzu, salad dressing, hot sauce, etc.).

Enjoy!  Veggies are done when you are happy with them.  I like mine practically raw, so they are on for about 10 minutes, but if you have them cut larger, or you prefer them more cooked, then you'll want to cook them for longer.

Sunday, August 24, 2014

seasonal peaches are the best

Pin It Now!

Juicy, delicious Ontario peaches are yet another reason that I just love summer.  There is nothing else that compares to the amazing flavour, and the sensation of the juices just running down your chin and arm while you eat it.

Peaches are one of the few fruits that I 100% refuse to buy out of season.  I've grown to accept the mediocre California strawberries that we get (obviously still not as good as fresh local ones, but hey, in February, I will take what I can get).  I just don't have this acceptance for peaches.  They must be local(ish) - technically, no one in my area actually can grow peaches because I guess it's too cold.  But Niagara peaches are awesome.

All that to say, when I can get delicious local peaches, I pounce on them.  I like to keep things simple, and this is a great way to have an amazing (and quick!) dessert.

Grilling peaches introduces a really sophisticated flavour note, and it makes the whole thing look a lot fancier than it really is.  I made the caramel sauce myself, but if you didn't want to, you could definitely purchase a good quality one from a store...though you should totally try making it, because it's quite simple, once you get the sugar caramelized.

grilled peaches with crown royal caramel and ice cream
grilled niagara peach with vanilla ice cream and crown royal caramel sauce

CARAMEL:
1/4 c water
1 c sugar
1/2 c cream (I used half and half)
sea salt
2 T crown royal

6 peaches
vanilla ice cream

1. Make your caramel in advance - put 1 c sugar in a medium/large pot (it will bubble up a lot, later, when you add the cream).  Add the 1/4 c water.  Don't touch it or stir it.  Just turn the burner to medium and watch.  It will likely take about 10 minutes (possibly more?), but the sugar will melt, it will all start to boil, and then all the water will evaporate, and eventually, it will start to turn brown.  You want to let it get pretty brown, for a more flavourful caramel, but you have to watch things closely, because it can burn and that is crappy.  I was a bit of a chicken, so my caramel isn't as brown as I would have liked.  But it was still good.

2. Once the sugar mixture has browned, remove it from heat, stand back, and carefully pour in the cream.  It will bubble up like crazy.  That's okay.  Once it calms down, add a good sprinkle of sea salt and the crown royal, and then stir.  Stir until it all comes together, and then let it cool.  You should probably taste it too.  Because caramel.

3. Halve the peaches and remove their pits.  Hopefully this goes better for you than it did for me.  I crushed a couple of mine trying to get the darn pits out.  Still tasted good.

4. Preheat the grill, brush a bit of a neutral oil (canola/grapeseed/peanut) on the peaches, and grill them, cut site down, for about 7-9 minutes.  You want a tiny bit of a char, and to allow some of the smokiness to flavour them.

5.  Serve the peaches topped with a scoop of ice cream and a good drizzle of caramel.  This was soooooooooo good!

Tuesday, August 19, 2014

'tis the season...for heirloom tomatoes

Pin It Now!

In a perfect world, I would eat a wonderful, sustainable, 100-mile diet.  But since I refuse to subsist entirely on root vegetables and preserves all winter, that doesn't really happen, and we enjoy product from around the world all winter long.

bryson farms layered heirloom tomato caprese salad

But come summer, I really want to do my best to enjoy the fantastic local produce grown (almost literally) in my own backyard (my own backyard having a massive patch of squash, which choked out everything else...maybe year two of gardening will be a bit more varied, hehe).

In the meantime, given my gardening failures, I get a local organic produce delivery from Bryson Farms, which isn't quite in my own backyard (Dekok, Acorn Creek and Shouldice are all closer), but I love the delivery aspect.  Farmers' markets are pretty awesome in theory, but I have a hard time scrambling everyone together to get going on a Saturday morning, and then the markets themselves are pretty crowded (not so awesome with an active two year old), and I never have enough small change.

So my lack of motivation/organization benefits to the extreme from nice farmers who are willing to bring their wares right to my front step.  You pay a premium, but I'm totally loving the variety of vegetables that we've been enjoying.

This past week, I got two containers of gorgeous rainbow heirloom tomatoes - all shapes, sizes and colours.  I knew they would be just perfect for a layered caprese-style salad.  There's no original recipe here - tomatoes + bocconcini + basil + salt + pepper - but I had a little fun with the presentation, and made a tomato pyramid.  I served this to six adults and three kids, and still had a bit left to take to work for lunch the next day.  It looked so pretty on the table, and I love how such simple, fresh ingredients can be showcased to perfection.  This is what eating local is all about, and I was happy to have these yummy tomatoes as the centrepiece for the meal.  :)

stacked heirloom tomato salad
serves 10 - easily made smaller
bryson farms layered heirloom tomato caprese salad
4 lbs heirloom tomatoes, assorted sizes and colours
2 containers bocconcini (mine came pre-sliced - bonus!)
1 bunch basil, cut in a chiffonade
fresh cracked pepper
fleur de sel

1. Slice the tomatoes with a serrated knife and arrange on a platter.  I find it's easiest if you start with the largest tomatoes, and then work the smaller ones in and around.  Mix up the colours and sizes.

2. While slicing the tomatoes, layer slices of bocconcini.  As you build up the layers of tomato/bocconcini, periodically add a light sprinkle of salt and pepper.

3. When you're done, sprinkle the basil over top.  I recommend keeping the dressing separate if you are in doubt of whether the salad will be finished in one sitting (the vinegar will make the tomatoes mushy).

balsamic-shallot vinaigrette
1/2 t sea salt
fresh cracked pepper
1 shallot, minced
3 T balsamic vinegar
2 T dijon mustard
1/2 c olive oil

1. Combine the salt, pepper, shallot and balsamic; whisk together.  Add in the mustard and whisk again.

2. Slowly drizzle in the olive oil while whisking until desired consistency/flavour is reached (usually somewhere between 2-3x the amount of vinegar that was used, depending on how acidic you like your dressing).

3. Drizzle over anything and everything.

That's it.  It's so yummy and simple and delicious.  And I had some of the leftover salad stuffed in a wrap with some turkey breast and it was also amazing.

Monday, August 11, 2014

party post - Frozen themed birthday party with DIY/game ideas

Pin It Now!

If you're a regular reader, you probably already know that I have two little girls.  This means that my house, more often than not, is filled with strains of "Let it Go" and "Do You Want to Build a Snowman?"  Accurate lyrics and pitch are optional, but spontaneous outbursts of song are not.

frozen birthday party DIYs and decor

My eldest just turned six, and with her Frozen obsession in full bloom (frost?), she wanted a Frozen-themed party. And she wanted to invite the whole class.

Naturally.

Since we recently moved to a place where a backyard party was a viable option, I decided to go with it.  And cross all fingers and toes that I hadn't just invited twenty tiny hooligans into my house.  Luck was with me - the day was a little warm (30C), but it was a beautiful day for a party.


IMG-20140810-WA0001

And while I know this is a food blog, I have to confess that this post isn't *really* about the food.  With having an afternoon party, I kept the food simple and sort-of healthy - a rainbow fruit tray (huge hit), a rainbow veggie tray (slightly less of a hit), a cheese and kielbasa tray, crackers, pretzel sticks Olaf arms, tortilla chips and salsa.  I don't have a great photo of the set-up, because I put the food out right at the last second, and it was immediately swarmed by small people.

frozen birthday party DIYs and decor

We also had a separate bowl of Olaf noses (baby carrots) and some melted snowman punch.  Pinterest gave me a lot of ideas for Frozen-themed food, but a lot of them were either really labour intensive (there was no way I was going to fuss with making 20 individual servings of each food), or they were full of blue dye.

I try to avoid artificial colours as much as I can, so my only cave to blue dye was a splash of blue gatorade in the melted snowman punch (recipe at the bottom of the post). And the cake icing, but most people don't really eat fondant, so I wasn't too concerned.

frozen birthday party DIYs and decor

Back to looking for party ideas on Pinterest.  There is definitely NO shortage of Frozen party ideas, and really, none of mine are terribly original. But one common theme that I found when looking through various craft ideas or favour ideas or food ideas is that many of them were either really time consuming, or really expensive.  I'm not going to lie, I did spend more than a few hours on this party, but none of the projects on their own were especially complicated/difficult, and none of the components (aside from Elsa and the cake) were particularly expensive.

What I'm telling you here is that if you like one of these ideas, you can easily do it and it won't take forever and it won't break the bank.

For decor, I primarily used balloons (made a quick garland with fishing twine) and tissue pompoms.  These are both cheap, and while the tissue poms can be a bit time-consuming, you can definitely knock off a few during an evening of netflix watching.  Funny story about the balloons - as the day got warmer and warmer, they started to self-destruct in the sun.  It was pretty funny.

  frozen birthday party DIYs and decor

I also stuck with inexpensive plastic table cloths, which was great because children spill everything everywhere, and this avoided a lot of clean-up woes. (As an aside, having an outdoor birthday party is the best thing...who cares about all the spilled drinks and all the messy crumbs....I shudder to think what my basement would have looked like after this party, but having it outdoors was GREAT!!!!!!).

frozen birthday party DIYs and decor

In terms of the artwork, if I had photoshop skills, I'm sure I could have figured something out on my own.  Alas, I have no skills.  So I used instant digital downloads from Etsy - they are inexpensive and simple, as long as you have a printer.  Plus, I had slave labour in the form of an almost six-year-old so I didn't have to do that much cutting.

I got this cute birthday garland.

frozen birthday party DIYs and decor

And these adorable food labels.

frozen birthday party DIYs and decor

For entertainment/activities, I have to admit that I overthought this a bit and my initial plan had the kids way overscheduled.  Thankfully I came to my senses and just let the kids do their thing.

I hired a princess for our party (the Snow Queen, from OfficialPrincessParties) and she was awesome.

MY elsa wears sneakers

Most of the kids just loved her, and she kept them very well entertained.  I don't have many photos, because I want to respect the privacy of my mini party guests, but rest assured, the kids had a blast.

frozen birthday party DIYs and decor

I had planned to do a pin the nose on Olaf game - a family member printed Olaf out for me, and I had my little slave cut out the noses.  We didn't get to the game though (kids were having too much fun playing!), so poor Olaf is still noseless.

frozen birthday party DIYs and decor

The pinata I decided we HAD to have also went unsmashed. Again, we didn't get to it, because the kids were so engaged with the princess, that by the time she left, it was time for cake!

As for what we did do, the kids decorated Elsa crowns or Sven antlers with stickers as they arrived.  I found the printables off this great blog, and just picked up some craft foam at dollarama (I used some of the orange foam for the Olaf noses).  I had a large spool of ribbon, so I used that to tie the crowns/antlers over the kids' sunhats.

frozen birthday party DIYs and decor

The kids also did some "frozen fractal" paintings, which was a great idea I got from this blog.  This was awesome because it was SUPER cheap and easy (I already had epsom salts, and then got paint brushes and construction paper from the dollar store) and it was a neat craft.  Here's a sample from an older guest (all my other shots have kids in them!).  It's neat to watch the salt crystals form from what looks like water at first glance. I think batman would approve.

frozen birthday party DIYs and decor

I did get a few licensed products from PartyCity (the Anna/Elsa stand-up, and the table decorations, as well as the pinata, plates and napkins).  You can probably find these things at any party store!

frozen birthday party DIYs and decor

I came across this beautiful cake idea on Pinterest, and as soon as I saw it, I knew it would be perfect for the party.  I liked the idea of a fondant cake on a hot day (to avoid melted icing) and I thought the little figurines were really cute on top of it.  I got the cake from Cakeadoodledoo and she did an awesome job, and saved me a lot of work.  I feel like this type of cake could probably DIY-able for someone with fondant skills, but I don't have those skills, and I always find cake is stressful, because you can't do it up in advance AND it makes a big mess in the kitchen. I had a 6" white cake on top and a 10" chocolate cake on the bottom and it was deeeeelicious.  And so cute, right?

frozen birthday party DIYs and decor

For favours, I wanted to keep things simple.  We had a no-gifts party, and I didn't want to send kids home with an armload of plastic trinkets (i.e., exactly what we wanted to avoid with the no-gifts party!), and when I came across this recipe for glitter playdough, I thought it would be perfect.

frozen birthday party DIYs and decor

It came together really well, and Z was able to help me make it.  I used a combination of blue liquid and gel food colouring (didn't have to add any yellow, surprisingly), and I bought glitter caddies from the dollar store and used blue and silver glitter in it.  I found the chevron tape at Staples, and then the cute little labels on top were from Etsy, and I just shrunk them a bit and cut them with a scalloped round punch I already had.  I made two quadruple batches of the dough and it easily filled 24 1/2 cup mason jars.  The dough is super soft and my kids have really enjoyed playing with it.

frozen birthday party DIYs and decor

I hope the ideas help those of you who might be planning Frozen parties for your Frozen-obsessed kids.  My bottom line advice would be not to overplan the activities (just let them play - we have a playstructure/sand box and that was the biggest draw of the party!). And write their names on their cups.  Just trust me on that one.

Melted Snowman Punch
(slightly lower in sugar/dyes than most punches...but still sugar and dye)
1 L sprite
1 L club soda
1 cup blueberries
1 cup frozen mini marshmallows
1/2 c blue gatorade (just enough to give a blue tinge)


Related Posts with Thumbnails