Photobucket - Video and Image Hosting

Sunday, March 30, 2008

back to the future...cooking edition

Pin It Now!

Time to saddle up your culinary delorean, undo the evils of missed dinners past and learn how to cook, plan and eat for the future.

the fruits of our labours

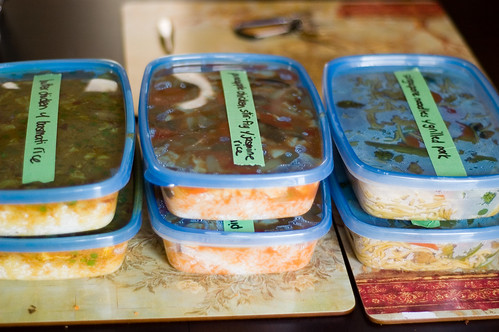
It's hard to imagine, but sometimes, just *sometimes*, the craziness of modern life can get in the way of cooking. There are some weeks where I (or anyone else, for that matter) may set out with the most true of intentions to cook beautiful homemade meals every night....but then stuff just happens (like you have to run out and buy a house, or you're getting mildly concerned because your baby is almost viable outside the womb and you have NOTHING whatsoever prepared), and it means that you don't get around to it.

And the irritating, wasteful and sad consequence is that you have all these lovely groceries that end up going bad AND you end up spending MORE money on take-out, delivery, eating out...or just generally eating unhealthily. 'Tis not so good.

Hubs and I are a little bad for this - on most Sundays, I'll plan out the meals for the week, write down the groceries needed, and then we'll shop for the week. I usually plan to make 4-5 meals, because I know that some nights we'll end up munching, some nights we'll end up having something strange going on, and of course, I still have night classes one night a week and hubs isn't always known for kitchen initiative....

Last week was a bit atrocious - only two of the five planned meals actually made it onto our table. At least this week, because we had a party on Friday, and company all weekend, I didn't end up really wasting anything....but it's still a little frustrating.

I have a solution for those weeks though. Alternatively, it can even be a solution for those random days off where you find yourself lounging about...nothing to do....you kinda want to cook, but there isn't really any need to....

The solution is cooking for the future. Cooking for the freezer, to be exact. Coming up with a meal (or two or three) that will serve you well in those weeks where you just don't have the time to put something on the table. Two to three hours in one afternoon can give you 3-6 meals worth of food that you can have on hand. It can save you TONS of money (cost is more like $7-8/meal vs. the $10+ per serving you'd spend on take-out), and it's also SO much healthier. At least you'll be able to pronounce all the ingredients.

Clearly, this isn't a remotely original idea....there are a number of companies out there (like Supperworks or Dashing Dishes) that have labour-free, really time-saving ways of doing this. BUT, if you're like me and prefer to DIY, or you are cheap (also like me!), or you live off the beaten path and this isn't even an option.....I have some ideas for ya!

Before I share some recipes though, because clearly this isn't the be-all and end-all of what you can cook and freeze, I want to share a few guiding principles to making this work for ya:

1) Make each item a complete meal. Make sure it has protein, starch and veggies. You might think you'll 'add a salad' or 'throw together some veggies' or whatever....but the reality is that on those nights where you want to rely on these meals, you will not have the time or energy to do that. So save yourself future heartache (and scurvy) and make the meal complete from the get-go.

2) Think about serving size when you freeze. What will work for you - single servings? Double servings? Family size? Choose a container that will fit your needs. If you're more likely to steal these for lunches, then use 2-2.5 cup containers. If it's a meal for two, choose a 4-5 cup container. And if it's for the whole fam damily, then get a big one!

3) Think about reheating method when you freeze. If it's something like a stirfry, that you're likely to heat in the microwave, for goodness' sake, don't stick it in a foil container. Alternatively, if it's pasta (like lasagna and canelloni) and still needs its finishing touch in the oven, don't put it in melty plastic.

4) ALWAYS label and date. You seriously have no idea how many random containers of frozen mystery food I have in my freezer. And I won't eat them, because I am pregnant and picky, and have no idea what they are. So PLEASE, take some masking tape and a sharpie (or other writing implement that won't run...ballpoint pen is good), and write down what it is that you've created, and when you've created it. You should make sure you consume the stuff within six months.

5) Some things just aren't meant to freeze. Pasta freezes well. Rice/stir fries/noodles freeze well. Potatoes don't freeze so well. Curries freeze well. Steak does not freeze well (unless you like reheated boot leather). Cream based sauces don't fare super well, but are still edible.

6) Don't leave too much extra room in the container. Unless you are lucky enough to have a snazzy vacuum sealer, you WILL have some air in the container. The more air you have, the more room you have for icky little ice crystals to grow and impart with your food with that oh-so-lovely freezer-burnt taste. So don't leave too much room.

7) Microwaving from frozen sucks the big one. It can be a little hard to plan ahead for this, but it really truly sucks to microwave a whole meal from frozen. The outside is practically incinerating, while you still have a frozen block in the middle. I VERY highly recommend three things:
a) Stick it in the fridge the day before you think you'll need it. It should be mostly defrosted by the next night.
b) Don't defrost in the original container. It's not all that great for you to microwave plastic, and if you're using a larger container, it will simply take FOREVER for the whole thing to get hot.
c) Don't forget that there was life before the microwave. It may seem old school, but heating things up on the stove is a LOT more even and sometimes it can even be quicker.

And without further ado, I'll share a few recipes I made today that work super well in the freezer:

Reduced-Fat Butter Chicken
(stolen and modified from Eat, Shrink and Be Merry)
This curry is easy on the palate, relatively mild and SUPER easy to make. You can use a rotisserie chicken, but if bony carcasses skeeve you, you can always cook up some chicken breasts to use in this. I'm a big fan of precooking the chicken on my indoor grill.

lower in fat butter chicken

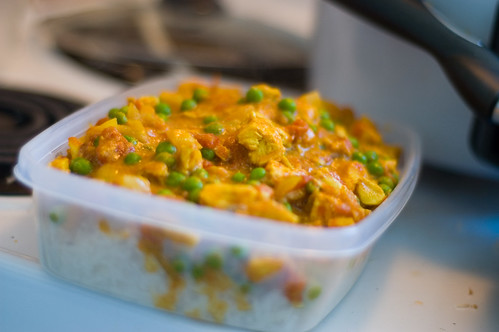
2 tbsp (30 mL) butter
1 cup (250 mL) chopped onions
2 tsp (10 mL) minced garlic
1 tbsp (15 mL) minced ginger root
1 tsp (5 mL) chili powder
1/2 tsp (2 mL) turmeric
1/4 tsp (1 mL) cinnamon
1.5 tsp curry powder
1 T curry paste (whichever kind you like...as always, I love Patak's)
19-oz (540-mL) can diced tomatoes, undrained
2 tbsp (30 mL) tomato paste
1 tbsp (15 mL) brown sugar
1/2 tsp (2 mL) salt
1/4 tsp (1 mL) freshly ground black pepper
4 chopped cooked chicken breasts (or use a rotisserie chicken)
1 cup frozen peas
1/3 cup (80 mL) light (5 per cent) cream
1/2 cup (60 mL) plain balkan-style yogurt
3 tbsp (15 mL) minced fresh cilantro
Hot cooked basmati rice

Directions:
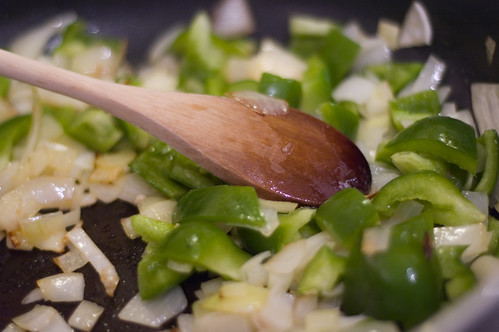
1. Melt butter in a deep skillet over medium heat. Add onions and garlic. Cook slowly, stirring often, until onions are tender, about 5 minutes.

2. Add ginger root, chili powder, turmeric, curry powder and paste and cinnamon. Cook 1 minute more.

to get curry spice into curry without getting curry spice balls

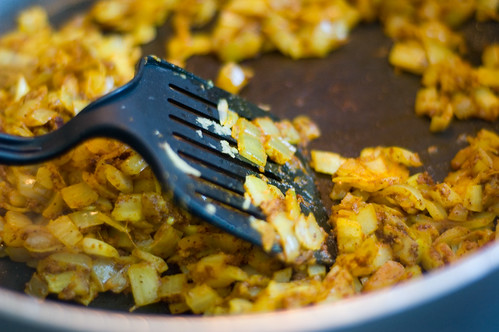
3. Add undrained tomatoes, tomato paste, brown sugar, salt and pepper. Reduce heat to low.

4. Cover and simmer 10 minutes, stirring occasionally. Add cut-up chicken, peas cream and sour cream. Simmer, uncovered, 5 minutes more. Remove from heat and stir in cilantro.

5. Serve over hot rice.

Special freezing instructions: I use basmati rice for this (3 scoops in my rice cooker) and freeze with the rice on the bottom. You can also keep the rice and curry separate, if you prefer, but I find having them layered makes serving easier, even though it does increase the propensity for the rice to soak up a lot of the sauce.

"Wowie Maui Chicken"
(stolen and modified from Looneyspoons)
This is a sweet and sour chicken type dish. It comes together really quickly, especially when you have your kitchen wench (aka hubs today...he's VERY indulgent of his preggo wife) chopping everything to your specifications!

pineapple chickeny goodness

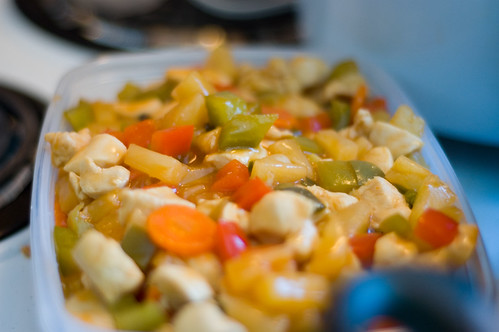
4 boneless, skinless chicken breast halves, cubed
3/4 cup finely chopped carrots
1/2 cup each: chopped red and green bell pepper

1 cup sodium-reduced, fat-reduced chicken broth
1 can of pineapple tidbits in juice, undrained

1/3 cup ketchup
2 tablespoons each: brown sugar, reduced-sodium soy sauce and white vinegar
2 cloves garlic, minced
3/4 cup chopped green onions
2 T water, 1.5 T cornstarch

1. Spray a large saucepan with nonstick spray. Add chicken. Cook over medium-high heat until no longer pink, about five minutes.

2. Add carrots, then 2-3 minutes later, add peppers.

3. Add the rest of the ingredients except onions, water and cornstarch. Stir well. Bring to a boil.

4. Add the onions, and stir in the combined water/cornstarch (to thicken the sauce). Make sure it boils or your sauce will be pasty and gross. Taste the sauce. If you want it zippier, feel free to add a little more ketchup/soy sauce.

5. When peppers reach desired doneness, serve over rice. I like to use jasmine rice for this dish (again, 3 scoops in the rice cooker, which amounts to about 1.5 cups of uncooked rice).

Freezing is the same for this as for the butter chicken - layer the rice and then add the chicken dish on top.

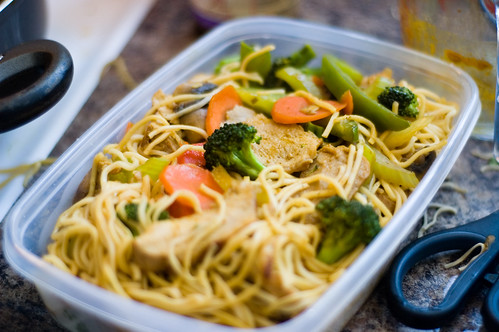
Singapore Noodles with Grilled Pork
This is my own recipe. It's quick, easy, tasty, gets lots of veggies into you and best of all, freezes really well.

curried noodles...v. tasty

1 pork tenderloin
pork tenderloin marinade (I used hoisin sauce because I had it. You need about 1/2 cup). Let the tenderloin marinate for about 1 hour at room temperature. This is a good thing to do at the beginning of a cooking marathon, because by the time you make your other food, the pork is nice and sweet and tasty)

2 T sesame oil
2 cloves garlic, minced
1 T minced ginger
1 carrot, thinly sliced
2 cups sliced mushrooms
1 green pepper, thinly sliced
1 red pepper, thinly sliced
1.5 cups broccoli florets
1 stalk celery, thinly sliced
(optional, because I forgot I had them - snow peas, bean sprouts!)
1/2 cup chopped green onion

200-250 g chow mein noodles (raw)

1/4 c. reduced sodium soy sauce
1/2 c. kikkoman stir fry sauce (you could substitute any combination of hoisin sauce, kecap manis, black bean sauce, teriyaki sauce, etc.)
1 T curry powder

1. Cook your pork tenderloin. I use the indoor grill. You could roast it, fry it, whatever. Just get it cooked. Once it rests for 10 minutes, slice it thinly.

there's a piece of meat for ya

2. In a large pot, boil enough water for your noodles. They will likely take 3-5 minutes to cook. Once they're done, drain them, rinse with cold water, and toss with about 1 T of sesame oil.

3. In a large pan/wok, heat the remaining 1 T of sesame oil over medium high heat. Add the carrots, mushrooms, garlic, ginger and celery (essentially, the veggies that will take the longest to cook).

4. Once the mushrooms start to release their water (rather than looking dry, they will start to shrink and you'll notice some water in our pan), add the remaining veggies. Toss for 3-4 minutes, until they start to soften.

5. Add the pork tenderloin, and in a small measuring cup, combine the soy sauce, stir fry sauce and curry powder. Pour the sauces over the veggie/pork mix and toss to mix. If you have some thick sauce remaining in the bottom fo your cup, add about 1/4 cup of water to it, then toss that in the pan as well.

stir fry

6. When everything is piping hot, add the green onions and the noodles. To save yourself some headache (I always make a HUGE mess when stirring this because it's too big for my pan!), add the noodles a clump at a time, rather than dumping the whole mess in. It's a lot easier to mix them if they are already separated a bit.

7. Toss until noodles are not. If you find you're a bit lacking in sauce, add a bit more! :)

Freezing instructions - nothing special. Stick it in a container and freeze.

I hope you'll find this handy - it's something you can do for yourself if you know you've got a busy time ahead of ya (like tax season for accountants, or a new baby on the way). It's something you can do for other people (if they've got a new baby, or if a family is going through a difficult time). It's a great way to efficiently use your groceries, to spend a Sunday afternoon with your hubby and to save yourself some time in the future! All in all, hubs and I spent about 2.5 hours (MAX) preparing this food, and that was with a lot of breaks and goofing off.

Thanks for reading! I WILL post a belly pic soon, I swear! :)

Monday, March 24, 2008

back in time for easter!!!!!!!!

Pin It Now!

I know, I know.

WORST. BLOGGER. EVER.

But you have to understand, since my last post, I've been slowly going a bit insane. I finished renovating my house. I sold my house. I went to Cuba. I bought another house. I got a new job. and I'm having a GIRL!

So yeah, it's been a little busy!

But, things are starting to calm back down, the brand new kitchen we renovated is starting to get a little use, FINALLY.

My mother in law was kind enough to host Easter dinner, so I thought that the least I could do would be to offer to bring my dessert (especially given that I got out of making turkey and all the trimmings - a good thing considering I'm not supposed to lift anything!).

Anyway, since there were to be 11 people for dinner, many of whom had given up dessert for Lent, I thought I'd give people a bit of an option....something that seemed "light" (but TOTALLY wasn't) and something intensely decadent (you know my style, hehe).

So this is what I ended up making....

Raspberry Lemon Layer Cake

lemon raspberry layer cake

Cake: 3 cups cake flour
2 teaspoons baking powder
1/2 teaspoon baking soda
1/2 teaspoon fine salt
1 1/4 cups sour cream
1/4 cup freshly squeezed lemon juice (about 1 1/2 lemons)
1 tablespoon pure vanilla extract
1 cup (2 sticks) unsalted butter, room temperature, cut into small pieces
2 cups sugar
1 tablespoon finely grated lemon zest (zest of 1 lemon)
5 large eggs, room temperature

Icing and Filling:
1 1/4 cups sugar
5 large egg whites
1 1/2 teaspoons freshly squeezed lemon juice
1/4 teaspoon cream of tartar
Pinch fine salt
1 1/2 cups (3 sticks) unsalted butter, room temperature, cut into small pieces

1/2 cup seedless red raspberry jam
1/2 cup lemon curd (or purchased lemon spread....for the lazy!)

For the cakes:
1. Position a rack in the lower third of the oven and preheat to 350 degrees F.

2. Lightly brush 2 (9-inch) round cake pans with shortening or butter. Line bottoms with buttered parchment paper and dust with flour. BTW, has anyone figured out WHY you can't buy rounds of parchment paper? I drive myself mental everytime, trying to trace the slippery stuff, and then trying to make sure I've cut off all the pen!

3. Sift the flour, baking powder, soda, and salt into a medium bowl; whisk to combine evenly. Sift - HAHHAHAHAHHAHAHAHAH! I don't sift. This could be my problem, but I just don't do it.

4. Stir the sour cream, lemon juice and vanilla together in a liquid measuring cup, and set aside.

5. Beat the butter in a standing mixer with the paddle attachment on high until light and creamy, about 2 minutes. Stop and scrape butter off the sides of the bowl. Continue beating while gradually adding the sugar-- it should take a couple minutes to add all the sugar. Continue beating until very light and fluffy, about 3 to 4 minutes more.

6. Scrape down the sides of the bowl and beat in the lemon zest.

7. Add the eggs, 1 at a time, beating well after each addition.

8. At low speed, add the flour mixture in 3 parts, alternating with the sour cream in 2 parts, beginning and ending with the flour. Scrape the sides of the bowl and mix for 15 seconds longer.

9. Divide the batter evenly between the prepared pans and smooth the top with a knife. (Lightly tap the pan on the counter so the batter settles evenly.)

10. Bake the cakes until a toothpick inserted in the center comes out clean, about 35 to 40 minutes. Cool in the pan on a rack for 20 minutes; then turn cakes out onto the rack to cool completely. I baked my cakes for about 30 minutes, and they ended up a touch overdone. I don't know if I need new pans, a new oven or both.....

For the Icing:
1. Bring a few inches of water to a boil in a saucepan that can hold a mixer's bowl above the water.

2. Whisk the sugar, the egg whites, lemon juice, cream of tartar, and salt in the bowl by hand.

3. Set the bowl above the boiling water and continue whisking until the mixture is hot to the touch and the sugar dissolves, about 1 to 2 minutes.

4. Transfer the bowl to a standing mixer fitted with the whisk attachment and beat the whites at medium-high speed until they almost holds a stiff peak and are cool, about 10 minutes.

5. Beat in the butter, a little at a time, until the icing is smooth and spreadable. (If the icing separates, just keep beating and it will come back together.)

**Note - I was lukewarm about this icing. First, the recipe didn't really make enough to nicely ice the cake. It made enough to cover the cake, but (as you'll see in the final photo), there wasn't enough for it to be really smoothable on the sides. The taste was okay....I used vanilla sugar, but I think I just don't really like buttery icing. I think it should have been a lot fluffier....it was quite dense. BUT, I was thanking my lucky stars for the kitchenaid....if I'd had to stand with a stupid hand mixer for 15 minutes, the icing would have been tossed!


To assemble the cake:
1. Slice each cake in half horizontally with a serrated knife, to make 4 even layers, taking care that they are as flat and straight as possible. Believe it or not, the cake actually sliced really well. I was nervous, but the cake was easy to cut and stayed together pretty nicely. No complaints there.

2. Set a large flat plate on a large inverted bowl or bottom of a salad spinner (of course, if you have a cake stand, use that), dabbing a little frosting on the bottom of the plate to secure it. Seriously, I can't imagine trying to balance a plate on top of a wee little bowl.....I have a glass cake stand...it doesn't rotate or anything, but it works pretty well for this.

3. Place a cake layer top side up on the plate. Using an offset spatula, spread about half of the raspberry jam in a thin layer over the first cake layer, leaving about 1/4-inch border along the outside. On the top cake layer, spread a thin layer of the lemon spread/lemon curd. I bought the E.D. Smith stuff. It's tasty!

4. Lay the second cake layer on top, stacking it as straight as possible. Using an offset spatula spread about 1 cup of the icing on the top layer.

5. Place a third cake layer on top. Spread remaining red raspberry jam over the cake layer, then spread the lemon curd over the fourth layer. Place the final layer on top, pressing down lightly to secure all 4 layers together. Spread about 3/4 of the remaining icing around the sides with a knife or offset spatula, then ice the top of the cake.

6. Use an offset spatula to smooth icing as much as possible. I have a nifty icing smoother thingamabob that I got to use for the first time. Of course, this is AFTER hubs stole it to use for tile adhesive....who knew kitchen implements could be so versatile???? He swears he washed it well. I washed it again, just to be safe. I kinda bungled up the icing a bit (there wasn't quite enough, and I just kinda suck at it anyway). I happened to have some pink buttercream in the freezer (froze it on a whim just to see if it would freeze). I defrosted it and used it to make the cake look snazzier. I think I need an icing course, but it still turned out cute! Canadian ladies, bulk barn is your friend for cake decoration stuff - it's cheap, you can buy only as much as you need and they have fun colours!

The final result: Looks - despite my mediocre icing job, it turned out really cute! Taste - BUT, I found the cake texture to be too hard and too dense. I think I am still in search of a nice moist, soft cake recipe. Preferably one that doesn't come out of a box. Let me know if you find one!

So yeah, that cake was a bit of a labour of love. It served REALLY well though - four layers always makes you look like a ktichen genius. Definitely WAY more work than the second cake. This second cake is chocolatey indulgence at its best. If you are someone who loves a rich, dark chocolate cheesecake.....this is for you. It is rich, silky and just incredible. Hubs is not a fan, but that makes my preggo butt happy, because there is all the more for me. :)

The technique might seem a bit weird at first, but it works really well, and it's my first cheesecake without a fissure the size of the grand canyon!!!!!!

Double Chocolate Cheesecake
(stolen and lightly adapted from www.epicurious.com)

double chocolate cheesecake

For crust:
1 9-ounce box chocolate wafer cookies
6 tablespoons (3/4 stick) unsalted butter, melted

For filling:
1 1/2 cup whipping cream
1 rounded teaspoon instant coffee powder
12 ounces dark chocolate, finely chopped (I used a bar of 70%, a bar of 85% and one of 60%)

2 8-ounce packages cream cheese, room temperature
3/4 cup sugar
1 tablespoon cornstarch
1 cup sour cream
2 T kahlua
3 large eggs

Make crust:
1. Preheat oven to 350°F.

2. Wrap outside of 9.5-inch-diameter springform pan with 2 3/4-inch-high sides with double thickness of foil (this recipe would be fine with a 10 inch pan too - the cake was quite high)

3. Spray bottom of pan with vegetable oil spray. Finely grind cookies in food processor. Add butter and process until blended. Press mixture onto bottom (not sides) of prepared pan. Refrigerate while preparing filling. I liked that, FOR ONCE, there was actually enough crust to easily cover the bottom of the pan. I like to use a flat bottomed potato masher to squish it all down evenly....I always bugger it up with my fingers.

Make filling:
1. Combine cream and coffee powder in medium saucepan.Stir over medium heat until coffee powder dissolves. Reduce heat to low. Add chocolate; whisk until chocolate melts and mixture is smooth. Cool 10 minutes.

2. Using electric mixer, beat cream cheese and sugar in large bowl until well blended.Beat in cornstarch.

3. Add sour cream and kahlua; beat well.

4. Add eggs 1 at a time, beating just until blended after each addition.

5. Whisk 1 cup cheese mixture into chocolate mixture. ***IF you want to make a pretty, swirly top, take about 1/3 cup of the white cheese mixture in a measuring cup and just set it aside. Swirls are pretty and make you look like a superstar and they take ZERO talent to actually do. :) Totally my style.

6. Return chocolate mixture to remaining cheese mixture; whisk until smooth.

7. Pour batter into crust. ***If you're making swirls, take a small spoon and drip/dollop the white cheese mixture over the chocolate mixture. Use a butter knife and swirl it all around. Don't try to be too orderly - this stuff swirls really nicely by just using a random pattern!

8. Place springform pan in large baking pan. (I had to use my turkey roaster)
Add enough hot water to baking pan to cone halfway up sides of springform pan. Bake cheesecake until softly set and slightly puffed around edges, about 1 hour.

9. Turn off oven. Let cake stand in oven 45 minutes. Transfer springform pan t0 rack and cool. Cover; chill cake overnight.

***IF I am somehow a cheesecake goddess and if for some reason your cake cracks, there are a few tried and true tactics - 1. Cover your cake with whipped cream, then melt some chocolate and drizzle artistically. 2. Melt an equal amount of whipping cream and chocolate (1/2 cup cream, 4 oz chocolate) to make a ganache. Pour it over and let it set for 1-2 hours.

Using a knife, cut around sides of pan to loosen cake.Remove pan sides. Cut into wedges and serve.

This cake totally rocks. It looks nice, but tastes absolutely AMAZING. YUMMY.

Thanks so much for reading! Who knows, if I get a few comments, you may even convince me to post a preggo pic.... :) I'm nearly 22 weeks now!

Sunday, January 06, 2008

WIshing you a happy 2008 through rustic italian pasta

Pin It Now!

So folks, it's been a while. A long while. Come to think of it, it's kinda been three months since my last real post.

Isn't that something, eh?

Funny how time flies.

Well, the good news is that I don't have to diet this year. In fact, I've got carte blanche to gain about 25-35 pounds over the next six and a bit months. Neat, eh?

Of course I can't drink any vino, and I'm supposed to avoid sushi and most other yummy indulgent things....but hey - there's a MINI FOODIE on the way! :) Coming late July/early August 2008. Let's all hope my picky kid posts don't come back to bite me in the arse or you al l will have great old belly laugh at my expense. :)

Anyway, I haven't posted much lately because, to be honest, I've barely been able to eat. I've felt kinda icky and not at all hungry....but the good news is that as the first tri is coming to an end, I'm actually back to looking at recipes and other food sites without turning green. So I can post again! And lucky for hubs, he actually gets to eat homemade food again.

First though, I have some confessions to make.....

In the last few weeks, I have:
- eaten boxed mac and cheese no fewer than three times
- sent my husband out at 1 am for Chicken McNuggets with bbq sauce because I HAD to have them
- insisted on eating a big mac (um.....EWWWWWWWWWWWWW)
- subsisted nearly entirely on simple carbohydrates
- generally grumped, whined and moaned my way through the first trimester.

On the up side Christmas brought a new attachment for the kitchen aid (a meat grinder - prepare for LOTS of new uses for ground meat).

Anyway, you don't come here for my random rambles, you come here for the food. So let's get to dinner. I wanted to come up with a kind of rustic italian stew - the kind a nice old italian nonna would have made for her hungry family (or at least something similar....y'all know that authenticity and I are rarely intimate bedfellows). But in the interest of not becomind a whale in the next bit, I wanted a way for it to be hearty, rustic but not to butt-enrounding.

This is what I came up with - I loved it. It had just the right amount of bite, acidity, texture, and is a good way to incorporate marginally sketchy fridge veggies that may be slightly past their prime (hey, is it really my fault that anything green or crunchy was out?????).

Rigatoni with Rustic Sausage Stew
1 lb rigatoni (or other chunky pasta)

2 T olive oil
(most people would put garlic here, but I still can't eat it....neither can hubs...because I can SMELL IT FOR DAYS....poor guy - use 2-3 cloves if you can stand it. Just don't talk to me after)
1 onion, diced (not too fine)
1 green pepper, diced (again, not too fine - we want chunky!)
1 head broccoli, coarsely chopped (you could use any veggie here - zucchini, mushrooms, etc.)
1 cup red wine (it's the only way I get to have any! and it really enhances the flavour)
1 can diced tomatoes, undrained
1 t oregano
1 t italian seasoning
1 T balsamic vinegar
1-1.5 cups low fat cottage cheese (sneaky way to up calcium)

6 lean italian turkey sausages (best way to lower the fat and uck content of this recipe)

parmesan cheese for grating

1. Set a big pot of salted water to boil.

2. Cook your sausages - I prefer doing them on my indoor grill. It's quick, easy, and if you slice the little suckers diagonally, it lets all the extra fat drain out.

anyone want a turkey weiner?

3. In a large, deep skillet, heat the olive oil over medium heat. Add the (garlic if you MUST...but again, do NOT come near me) onion and green pepper. Sauté until the veggies brown just a little bit (like nonna went outside to yell at the family to come in and got distracted a moment).

so i browned 'em.  so sue me

4. Add the wine. Let it boil until it's about half evaporated.

the only way I get to have vino for the next 6 months...

5. Add the can of tomatoes, the oregano and the italian seasoning. Add the broccoli at this point too.

6. Meanwhile, your sausages should be just about done. Using a sharp knife, slice them up and toss them in with the sauce. Add the cottage cheese.

not the image you want of your weiner....

7. Now your water should be boiling. Cook the pasta about 12 minutes, until done to your liking. This will give your stew time to blend and develop a little more flavour. If it's losing too much liquid, turn the heat down.

8. Drain the pasta, return to the pot and dump your stew in on top. Serve topped with parmesan cheese. It would be fabulous with a nice italian red...but you'll have to raise a glass for me, as I am reduced to toasting with grape juice. :)

dinner is served!

Thanks for reading! Now that I seem to be able to eat again, I will be back!

Saturday, December 01, 2007

SHF 37: The Beta Carotene Harvest - Part 2!

Pin It Now!

Welcome all to part two and thanks for your patience!

Marija from Palachinka came up with a Serbian Pumpkin Pie that looks divine!
Photo Sharing and Video Hosting at Photobucket

Julie from A Mingling of Tastes shares a super-moist pumpkin batter that's the base for a holiday bundt cake. Check out her All-in-One Holiday Bundt Cake!
Photo Sharing and Video Hosting at Photobucket

Nicole from Audaciousness presents her carrot custard with graham cracker topping and lime-cilantro syrup. Fun!
Photo Sharing and Video Hosting at Photobucket

Kayla from Mama Yogini (fun name, btw!) submits her Pumpkin Bread Pudding with Caramel Sauce and Whipped Cream. Great use of a slow cooker, if you ask me!
Photo Sharing and Video Hosting at Photobucket

Sara from Cupcake Muffin made pumpkin cupcakes with cream cheese frosting for a friend's birthday party. Happy b-day!
Photo Sharing and Video Hosting at Photobucket

Chris from Mele Cotte created a wonderful fall 'brunch' cake. Check out his Spiced Pumpkin Cake!
Photo Sharing and Video Hosting at Photobucket

Monica, the Pastry Princess sends us her Sweet Potato Hazelnut Tart and Pumpkin Financiers. Sounds awesome!

Carolyn from French Peach created Pumpkin Bars with Cream Cheese Frosting....I'm loving the frosting.
Photo Sharing and Video Hosting at Photobucket

Susan from Sticky, Gooey, Creamy, Chewy shares a rich and creamy dessert made witha gingerbread cake base and a pumpkin cream filling.....check out her Pumpkin Gingerbread Trifle!
Photo Sharing and Video Hosting at Photobucket

Melody from Fruittart combined tropical with temperate with her carrot pineapple cupcakes.
Photo Sharing and Video Hosting at Photobucket

Julie from The Persnickety Palate shares a Paradise pumpkin pie that she made for thanksgiving (with fresh pumpkin) along with some toasted pumpkinseeds.
Photo Sharing and Video Hosting at Photobucket

Cenk from Cafe Fernando has created a carrot cake with both chopped walnuts and dried blueberries. Love it!
Photo Sharing and Video Hosting at Photobucket

David from Sketchy's Kitchen satisfies our sweet tooth with his Pumpkin Cheesecake with Navan Cream.
Photo Sharing and Video Hosting at Photobucket

Gretchen from Canela & Comino shares her Pumpkin Cake with Chocolate Icing, made with her first ever roasted pumpkins. Looks great!
Photo Sharing and Video Hosting at Photobucket

Linda from Make Life Sweeter! just squeaked in with her Carrot Ganache Covered and Clementine Curd Filled Petit Four (can I just say that looks fabulous?).
Photo Sharing and Video Hosting at Photobucket

A HUGE thank you to all those who participated. Such a great variation of tasty, nutrient-filled treats! I REALLY hope I haven't missed anyone - I have a sneaking suspicion that my spam filter may have caught some of your entries, and I wasn't able to check this account while I was in Thailand. SO...if I've missed you, PLEASE let me know and I would be most happy to add you in.

You can find next month's SHF 38, "The Proof is in the Pudding" at Kochtopf. Looks like a great theme! I'm looking forward to a December that is hopefully (perhaps naively?) a little less crazy than November and October have been. I'm anxious to post a whole whack of stuff and anxious to have y'all read about it.

Thanks for reading, and again, a HUGE thanks to Jennifer from the Domestic Goddess who created the whole SHF shebang. :)

Friday, November 30, 2007

SHF 37 - The Beta-Carotene Harvest - Part 1

Pin It Now!

So here it is - the fist part of the round-up of all the fabulous bloggers who participated in November's edition of Sugar High Friday! There were quite a number of you, so hopefully I didn't miss anyone (but if I missed yours, let me know I will be happy to add). I received TONS of submissions, and I'm totally jet-lagged right now, so I promise to have the rest of 'em all up first thing tomorrow morning. MUCHO thanks to all those who participated, and also to Jennifer of the Domestic Goddess who came up with the whole idea.

November has completely whizzed by for me - between work, class and travelling to Thailand for my father's wedding, it feels absolutely impossible that it's the end of the month already! November is ending with a white, blasty bang here, so it seems almost impossible to fathom that mere weeks ago people were actually harvesting from the cold, frozen ground. :)

And without further ado, I invite you to travel the globe (virtually, of course!) and check out this month's entries into Sugar High Friday....

Brittany from The Pie Lady has come up with a lovely sweet potato flan with brandy snaps, cider reduction and glazed pecans. Yummy!
Photo Sharing and Video Hosting at Photobucket

Sophie from Mostly Eating created butternut squash, oat and ginger cake bites for your perusal and enjoyment. Check them out!
Photo Sharing and Video Hosting at Photobucket

Judy from No Fear Entertaining offers us a vamped-up version of pumpkin bread in the form of muffins. I bet that smelled fabulous!
Photo Sharing and Video Hosting at Photobucket

Courtney from Coco Cooks gives a twist on the traditional Spanish/Latin American churro, with her sweet potato and orange zest version. Looks very tasty!
Photo Sharing and Video Hosting at Photobucket

Rosa, a fellow Canuck from Rosa Jackson: Edible adventures in Paris, Nice and beyond, has baked up a batch of butternut squash muffins. Watch out Jamie Oliver!
Photo Sharing and Video Hosting at Photobucket

Helen from Tartelette has baked up an exquisite Pumpkin Praline Cheesecake for you to try. One would expect nothing less from the Tartelette!
Photo Sharing and Video Hosting at Photobucket

Caroline from A Consuming Passion profers a simple yet exceedingly flavourful pumpkin breakfast cake. Beautiful work!
Photo Sharing and Video Hosting at Photobucket

Rachel of Vampituity stepped out into the world of weird and different with this very fun cantaloupe soup. Kudos for thinking outside the (carbon shoe)box!
Photo Sharing and Video Hosting at Photobucket

Anne from A Foodie Froggy in Paris came up with a creative and tasty-sounding orange tart (yep, they do have a lot of betacarotene!). Merci Anne!
Photo Sharing and Video Hosting at Photobucket

Inge from Vanielje Kitchen offer yummmmy sounding Spiced Carrot, Pineapple and Walnut Cake. Not your average carrot cake for sure!
Photo Sharing and Video Hosting at Photobucket

Susan from Food Blogga came up with a very snazzy Persimmon and Date Bread...not to be missed!
Photo Sharing and Video Hosting at Photobucket

Eva from The Golden Shrimp played around and came up with Sweet and Savoury Parsnip Muffins. I love parsnips!
Photo Sharing and Video Hosting at Photobucket

Meeta from What's for Lunch, Honey? gives us a wonderful take on Crème Caramel, flavouring it with sweet potatoes and toffee. I'm drooling - yum!
Photo Sharing and Video Hosting at Photobucket

Daniela from Fragole & Cioccolato has created a rustic and spicy tart, to be enjoyed with a cup of tea. Grazie!
Photo Sharing and Video Hosting at Photobucket

Cakelaw from Laws of the Kitchen shares with us a low fat cake laden with the goodness of pumpkin and sultanas - check it out!
Photo Sharing and Video Hosting at Photobucket

Karyn from Hot Potato has created mini pies that provide the same cute one-serving appeal as cupcakes...but they are pies! Check out her mini pumpkin pies!
Photo Sharing and Video Hosting at Photobucket

Louise from Knit 1 Bake 2 revamped the humble carrot cake with her Ultimate Carrot Cake with Marscapone and Fromage Frais Topping.
Photo Sharing and Video Hosting at Photobucket

Nora of Life's Smörgåsbord comes from down under and refreshes us with a Mango and Apricot Frappé.
Photo Sharing and Video Hosting at Photobucket

Ann of Redacted Recipes shares her Bittersweet Carrot Orange Cake Mini Bundts with Cream Cheese Frou Frous. Cute!
Photo Sharing and Video Hosting at Photobucket

Elizabeth from SMBSLT's Journal shares her delicious and moist Pumpkin and Sour Cherry Scones. I will have to try sometime!
Photo Sharing and Video Hosting at Photobucket

Related Posts with Thumbnails